User Guide
![]()
Welcome to the TutAssistor User Guide! Simply choose a topic below to find answers, learn about the features, and manage tutoring better.
Table of Contents
-
2.2 Try it yourself!
-
Features
3.1 Add student/class
3.2 View student/class
3.3 Edit student/class
3.4 Delete student/class
3.5 Add/Remove student from class
3.6 Add remark
3.7 Find students/classes
3.8 List students/classes
3.9 Sort classes
3.10 View timetable
3.11 View today's classes
3.12 View help
3.13 Navigate Input History
3.14 Clear data
3.15 Exit the program
3.16 Track paymentcoming in v2.0 -
- Command Summary
1 Introduction
1.1 What is TutAssistor?
Welcome to the user guide of TutAssistor!
Are you a private tutor struggling to keep track of all your classes and students? Do you spend countless hours on administrative duties such as scheduling classes and updating numerous students’ records?
If the above situation sounds familiar to you, fret not, TutAssistor is here to save the day!
TutAssistor is a desktop app intended for private tutors like yourself to manage their students and classes, and it is optimized for use via a Command Line Interface (CLI).
TutAssistor uses Command Line Interface (CLI); this means that you operate the application by typing commands into a Command Box. If you are a fast typer, you can operate the application more easily and faster than Graphical User Interface (GUI) applications; GUI applications allow users to interact with the application via graphical icons such as buttons.
You do not have to worry at all even if you are new to CLI applications as this user guide will take you through step by step on how various features of the TutAssistor can be utilised, all directed towards providing the best possible experience to the user.
1.2 What can TutAssistor do for you?
TutAssistor provides an all-in-one platform for you to manage information regarding your students and lessons stress-free and efficiently. In the latest version, we offer you the ability to:
- Track student details
- Keep student details up-to-date
- Resolve conflicting tuition timeslots
- Efficiently create notes for each class/student
- View scheduled lessons in a timetable
1.3 How to use this guide?
Step-by-step guide for each feature
The features in this guide are formatted with the following conventions:
-
Command Keyword - Each feature is executed by a command keyword. The shortcut for each command is shown together with its full command keyword separated by the
|symbol. You can use the command shortcuts to reduce typing. - Command Format - Each command is accompanied by a set of information that you provide. Refer to the Features below for details of each command.
- Examples - Possible usage of each features are provided. You may follow these examples when familiarising with the app.
- Screenshots - A visualisation of the expected outcome is provided for some features.
General symbols and syntax used in this guide
For additional information accompanying each segment, look for the following symbols:
| Syntax | What it means |
|---|---|
| |
Precedes information that are useful to remember. |
| |
Precedes information that serve as tips for a feature. |
| |
Precedes information as an important warning. |
Jump right in to the next section: 2 Get Started to get you started!
2 Get Started
2.1 Installation guide
For Windows
- Ensure you have Java 11 or above installed in your Computer. You may install it here.
- Download the latest TutAssistor release from our github site.
- Double click the downloaded TutAssistor.jar file to launch TutAssistor.
For Mac
- Ensure you have Java 11 or above installed in your Computer. You may install it here.
- Download the latest TutAssistor release from our github site.
- Open Terminal.
-
Change the active directory to the location of TutAssistor.jar.
For example,
cd Downloads -
Run the following command.
java -jar TutAssistor.jar
After launching the app, the GUI similar to the one shown below should appear in a few seconds. Note how the app contains some sample data.
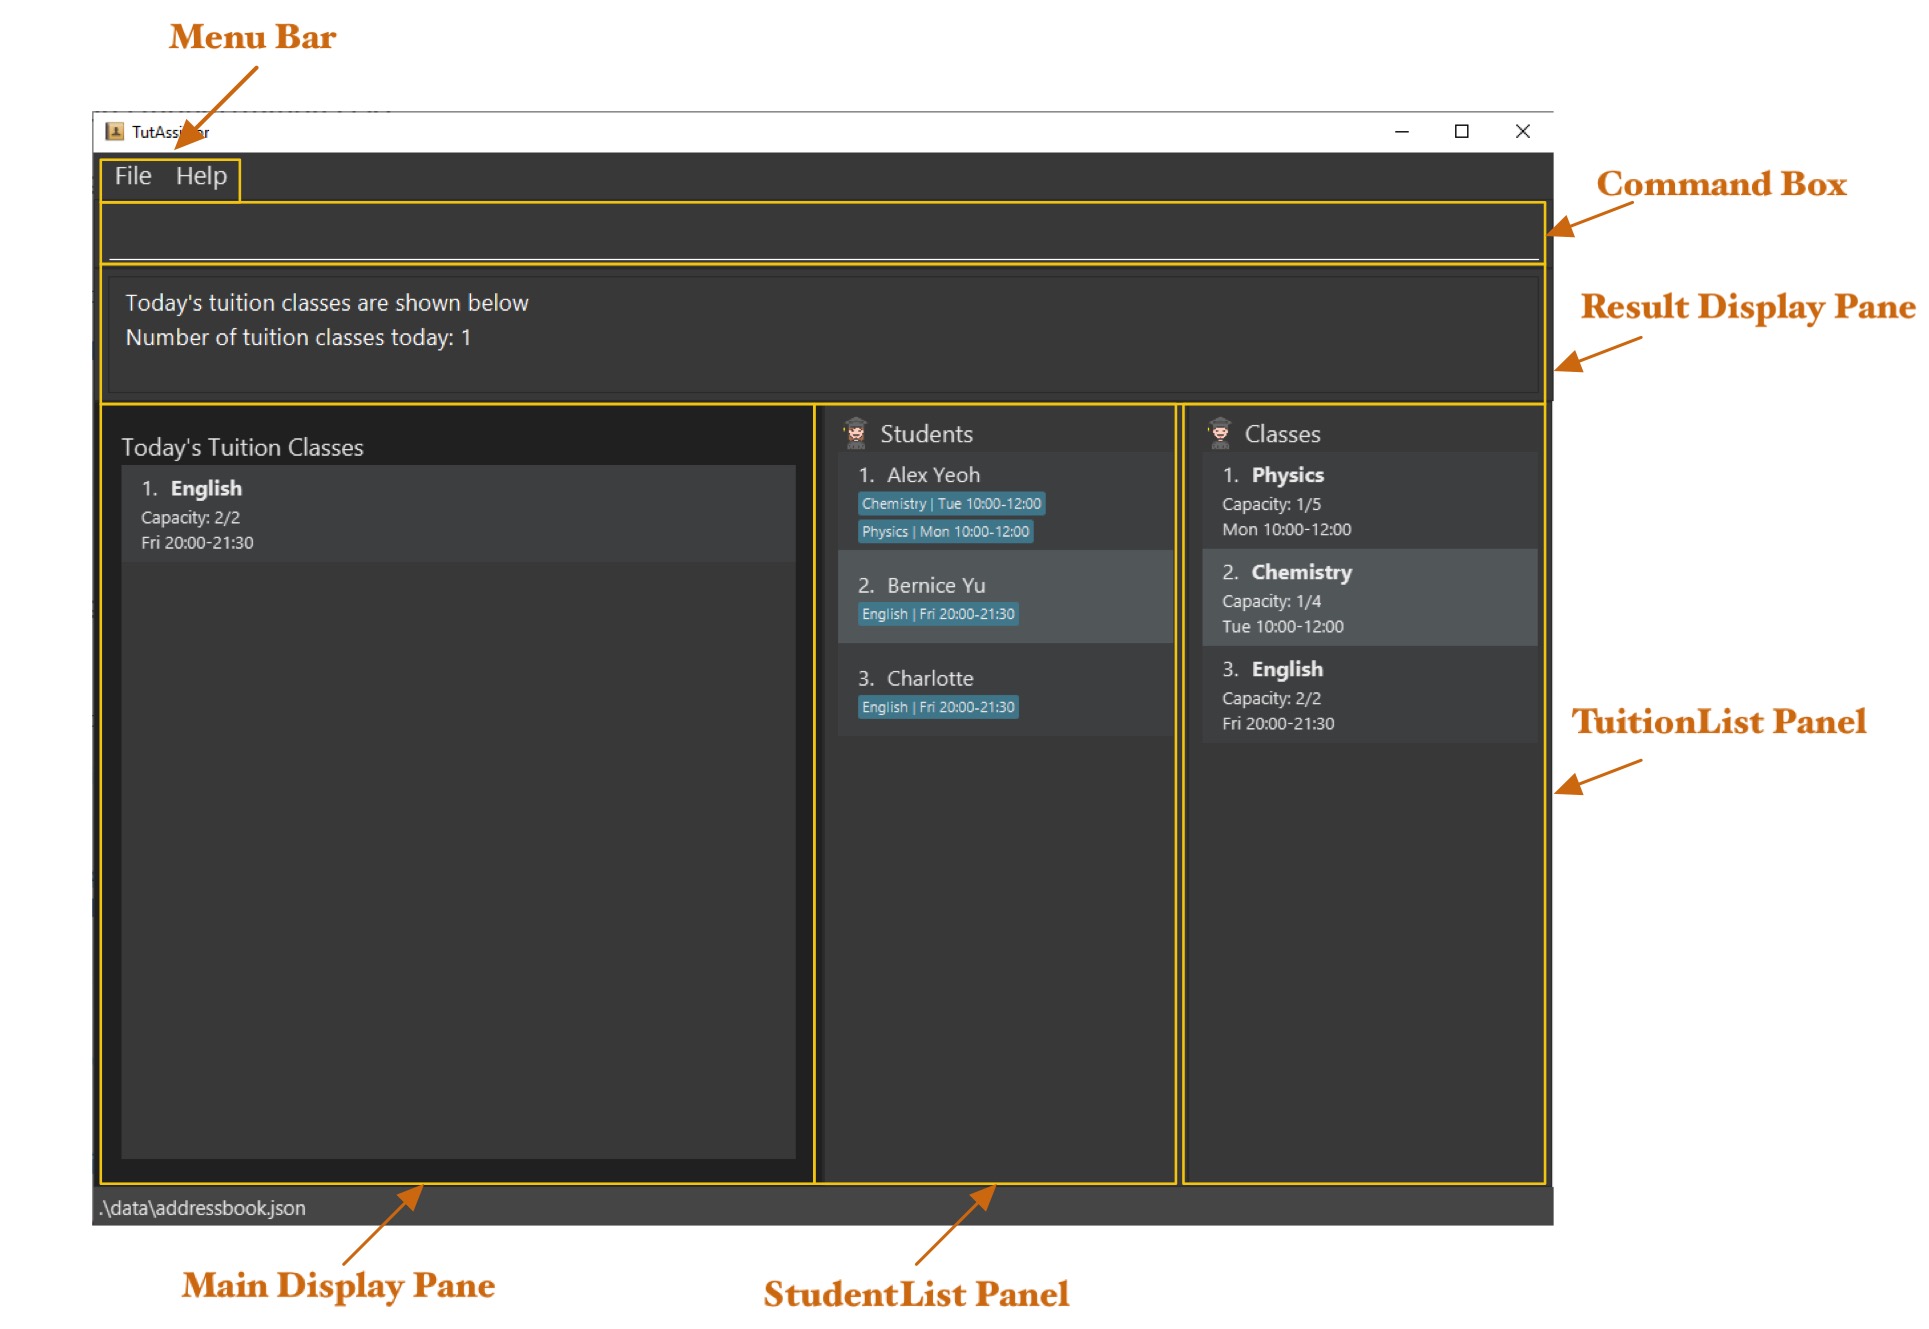
Figure 1: GUI of TutAssistor
| Component | What it does |
|---|---|
| Menu Bar | Exits TutAssistor or views help. |
| Command Box | Key in commands |
| Result Display Pane | Displays feedback of commands. |
| TuitionList Panel | Displays all tuition classes. |
| StudentList Panel | Displays all students. |
| Main Display Pane | Displays today’s lessons, tuition class’s or student’s details, or a timetable. |
2.2 Try it yourself!
Once you have installed the latest TutAssistor, why not give it a try?
Type the command in the command box and press Enter to execute it. e.g. typing help and pressing Enter will open the help window.
Some example commands you can try:
-
student 1: Views the first student shown in the student list. -
add n/John Doe p/98765432 e/johnd@example.com a/John street, block 123, #01-01: Adds a student namedJohn Doeto the TutAssistor. -
addtoclass si/3 tc/1: Adds the 3rd student in the student list to the 1st class in the tuition class list. -
deleteclass 2: Deletes the 2nd class shown in the tuition class list. -
clear: Deletes all students and classes. Note that this action is irreversible. -
exit: Exits the app.
Now that you are more familiar with our app, make it yours! Head over to section 3 Features to learn more about the features TutAssistor can offer you!
3 Features
![]() Notes about the command format:
Notes about the command format:
-
Words in
UPPER_CASEare the parameters to be supplied by the user.
e.g. inadd n/NAME,NAMEis a parameter which can be used asadd n/John Doe. -
Items in square brackets are optional.
e.gn/NAME [r/REMARK]can be used asn/John Doe r/studentor asn/John Doe. -
Items with
… after them can be used zero or more times.
e.g.si/STUDENT_INDEX [STUDENT_INDEX]…can be used assi/1,si/1 2 3etc. -
Parameters can be in any order.
e.g. if the command specifiesn/NAME p/PHONE_NUMBER,p/PHONE_NUMBER n/NAMEis also acceptable. -
If a parameter is expected only once in the command but you specified it multiple times, only the last occurrence of the parameter will be taken.
e.g. if you specifyp/12341234 p/56785678, onlyp/56785678will be taken. -
Extraneous parameters for commands that do not take in parameters (such as
help,list,exitandclear) will be ignored.
e.g. if the command specifieshelp 123, it will be interpreted ashelp.
Refer to the Additional Command Format Information under section 4 to learn the requirements of the various parameters used.
3.1 Add student/tuition class
Adding a student: add | a
Adds a student with the specified information such as name, phone number, etc.
Read more on the requirements of the various parameters used.
Format: add n/NAME p/PHONE_NUMBER e/EMAIL a/ADDRESS [r/REMARK]
Examples:
add n/John Doe p/98765432 e/johnd@example.com a/John street, block 123, #01-01
a n/Tom Ng p/97865342 e/tomng@eg.com a/221B Baker St r/Can only attend on even weeks
James Yeoh and james yeoh are considered the same person, namely Name is case-insensitive and the differences in whitespaces would not be considered.
Adding a tuition class: addclass | ac
Adds a tuition class with a set limit of students at a specified timeslot. TutAssistor will notify you if there are any conflicting timeslots.
Format: addclass n/NAME l/LIMIT ts/TIMESLOT [s/NAME,NAME,NAME...] [r/REMARK]
- It is optional to add students into the class when creating a tuition class.
- The timeslot should follow the format “Ddd HH:mm-HH:mm”.
- The limit of a class should not exceed 1000.
Examples:
addclass n/Chemistry l/16 ts/Thu 15:00-17:00 s/Bernice Yu,Richard Ng
ac n/Math l/8 ts/Mon 11:00-14:00 r/Quiz on final lesson
3.2 View student/tuition class
Displays the details the specified student or class in the information page.
3.2.1 Viewing a student: student | vs
Format: student INDEX
Example:
student 2
or
vs 2
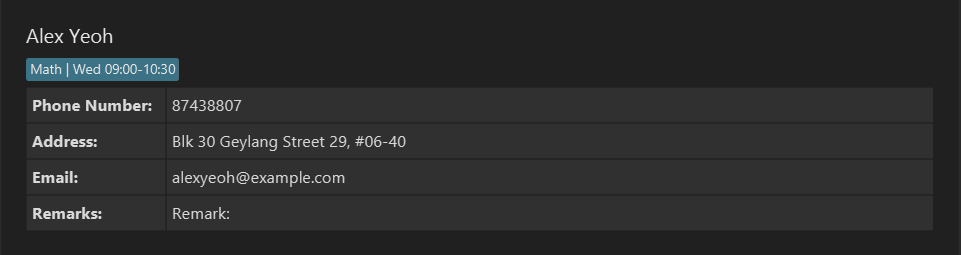
Figure 2: Displaying a student's details in the information page
3.2.2 Viewing a tuition class: class | vc
Format: class INDEX
Example:
class 3
or
vc 3
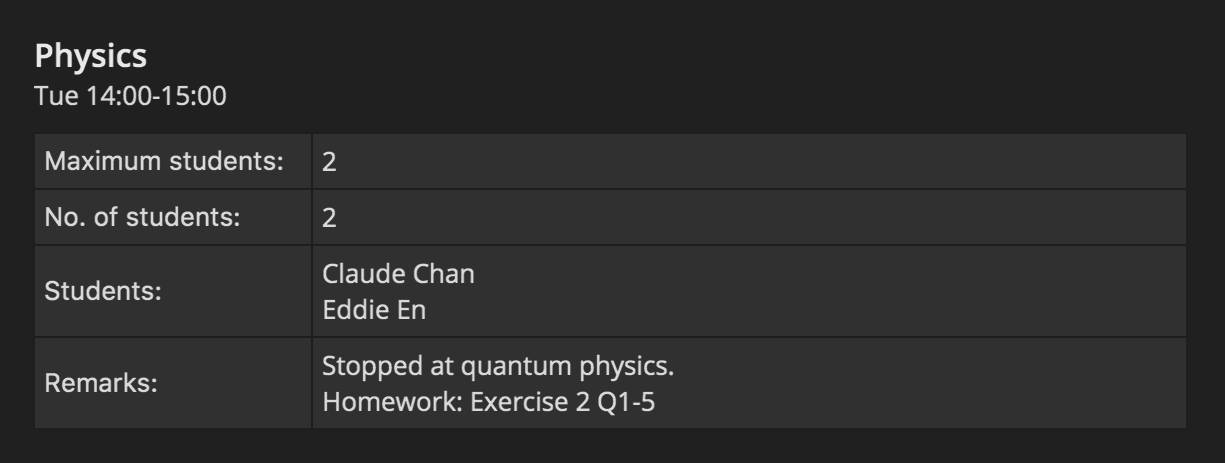
Figure 3: Displaying details of a class in the information page
3.3 Edit student/tuition class
Edits an existing student or tuition class.
Editing a student: edit | e
Format: edit INDEX [n/NAME] [p/PHONE] [e/EMAIL] [a/ADDRESS]
Examples:
edit 1 n/Jason Tan a/221b Baker Street
or
e 1 n/Jason Tan a/221b Baker Street
Editing a class: editclass | ec
Format: editclass INDEX [n/NAME] [l/LIMIT] [ts/TIMESLOT]
Examples:
editclass 1 n/Math ts/Wed 10:00-12:00
or
ec 1 n/Math ts/Wed 10:00-12:00
An example output of using the editclass command is shown below:
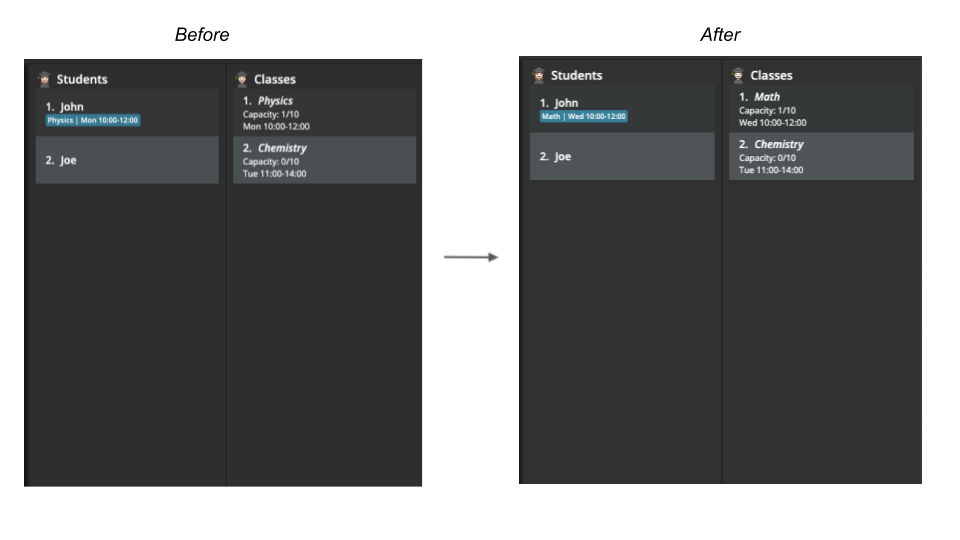
Figure 4: Example of executing `editclass 1 n/Math ts/Wed 10:00-12:00` command
3.4 Delete student/tuition class
Deletes a student or a tuition class from TutAssistor.
-
At least one student or class index must be provided.
-
Provide multiple indices to delete multiple students or classes at once.
Deleting students: delete | del
Format: delete STUDENT_INDEX [STUDENT_INDEX]...
Example:
delete 1 2
or
del 1 2
An example output of using the delete command is shown below:

Figure 5: Example of executing `delete 1 2` command
Deleting tuition classes: deleteclass | delc
Format: deleteclass CLASS_INDEX [CLASS_INDEX]...
Example:
deleteclass 1 2
or
delc 1 2
3.5 Add/Remove student from class
Moves a student to/from a class.
Adding existing students to a class: addtoclass | atc
Adds one or more existing students to an existing class.
![]() Note: When adding multiple students at once:
Note: When adding multiple students at once:
-
use commas(
,) to separate names, with no spaces after each comma. -
use spaces to separate indices.
Format:
addtoclass si/STUDENT_INDEX [STUDENT_INDEX]... tc/CLASS_INDEX
or
addtoclass s/NAME[,NAME,NAME...] tc/CLASS_INDEX
Examples:
addtoclass si/1 tc/1
atc si/1 2 3 4 tc/1
addtoclass s/James,Felicia tc/2
atc s/James tc/3
Removing existing students from a class: remove | rm
Removes an existing student from a tuition class.
Format: remove si/STUDENT_INDEX [STUDENT_INDEX]... tc/CLASS_INDEX
Examples:
remove si/1 tc/1
rm si/1 2 3 4 tc/2
3.6 Add remark to student/tuition class
Upon entering the command, a pop-up window with a text box is displayed for you to edit remarks.
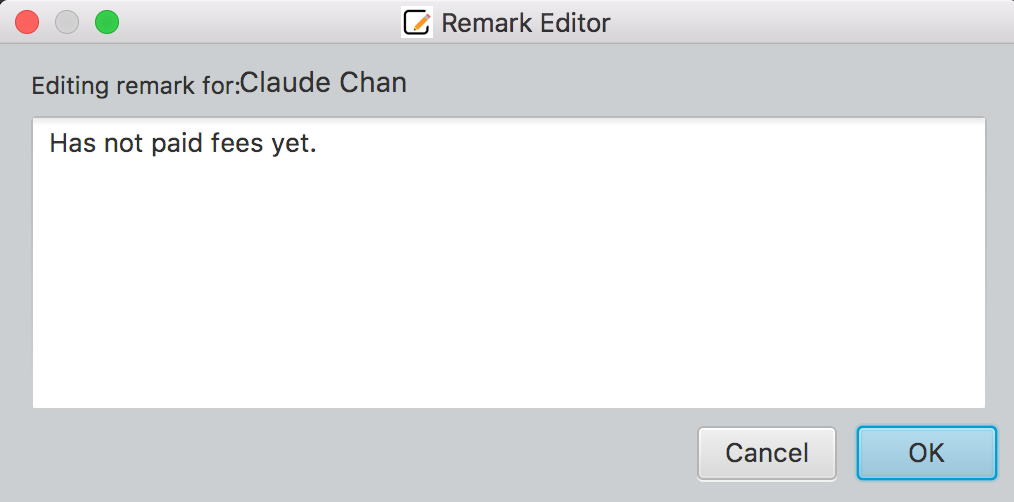
Figure 6: Editing remarks with editor window
Adding remark to a student: remark | re
Adds a remark for a student.
Format: remark STUDENT_INDEX
Example:
remark 2
or
re 2
Adding remark to a tuition class: remarkclass | rec
Adds a remark for a tuition class.
Format: remarkclass CLASS_INDEX
Example:
remarkclass 2
or
rec 1
add command, you can use the optional r/REMARK parameter to add remarks directly.
3.7 Find student/tuition class
Filters the list based on the given keywords. The keywords are case-insensitive.
findclass phys will not filter physics classes.
Finding students by name: find | f
Displays a list of students whose name matches the given keywords.
Format: find KEYWORD [KEYWORD]...
Example:
find alice tan
or
f alice tan
TutAssistor will display a list of all students with alice or tan in their name.
Finding classes by name: findclass | fc
Displays a list of classes whose name matches the given keywords.
Format: findclass KEYWORD [KEYWORD]...
Example:
findclass physics chemistry
or
fc physics chemistry
TutAssistor will display a list of all classes with physics or chemistry in their name.
The filtered list should look similar to the example shown below:
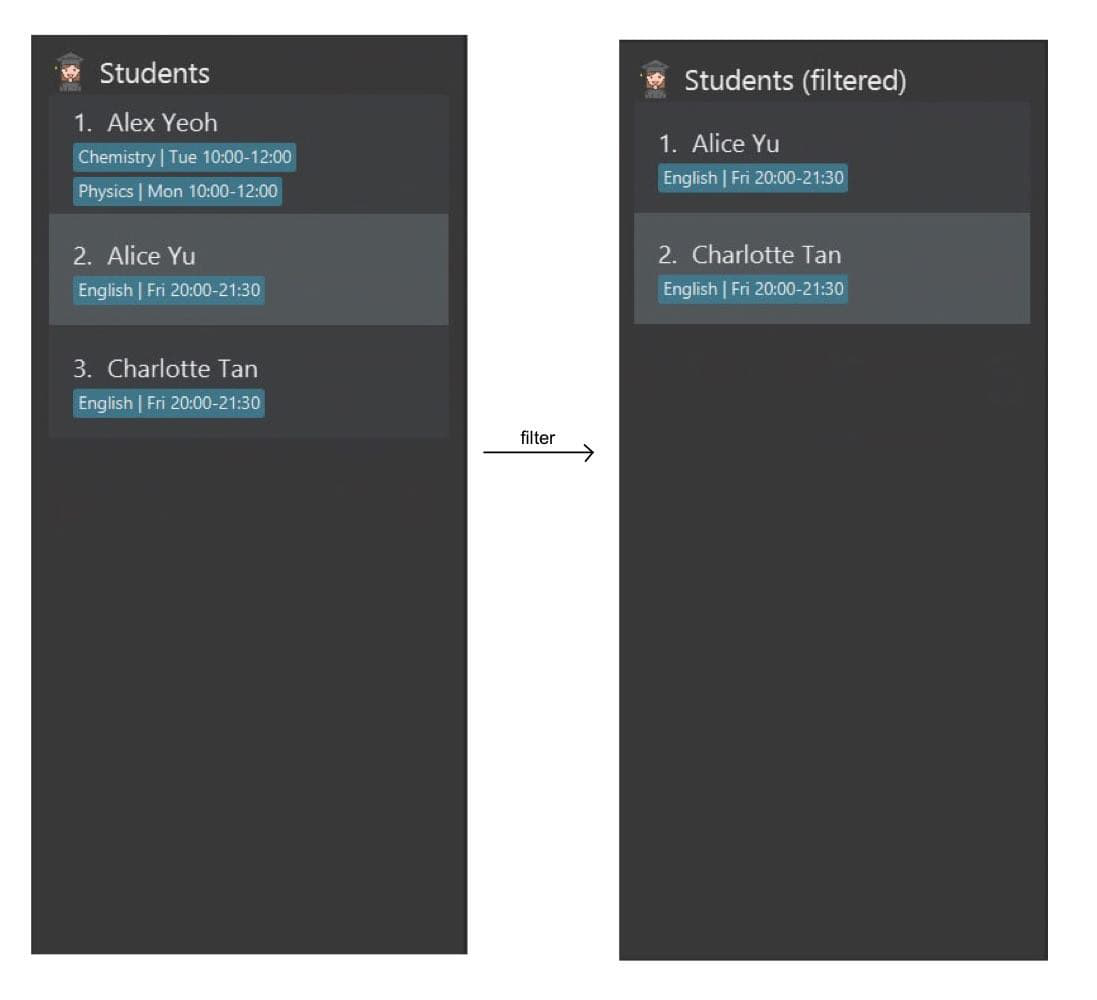
Figure 7: Example of executing `find alice tan` command
3.8 List all students/tuition classes
Shows the full list of students or classes.
Listing all students: list | l
Displays a list of all students.
Format: list
Listing all classes: listclass | lc
Displays list of all classes.
Format: listclass
3.9 Sort tuition classes: sort | s
Sorts tuition class list according to time or alphabetical order.
- After the user executes the
sortcommand, the list will continue to remain sorted even after adding or editing classes. - The list will not be automatically sorted upon restarting TutAssistor, i.e., the user will have to execute the
sortcommand again.
The possible usages of sort are given below:
-
sortsorts by time -
sort o/ascsorts by ascending alphabetical order -
sort o/descsorts by descending alphabetical order -
sort o/timesorts by time
![]() Note:
Note:
-
For alphabetical order, the sorting is case-insensitive. For example,
chemis considered the same asChem. -
For time order, the sorting assumes Gregorian calendar format. i.e. Sunday is considered the start of a week and Saturday is considered the end of a week.
An example output is shown below:
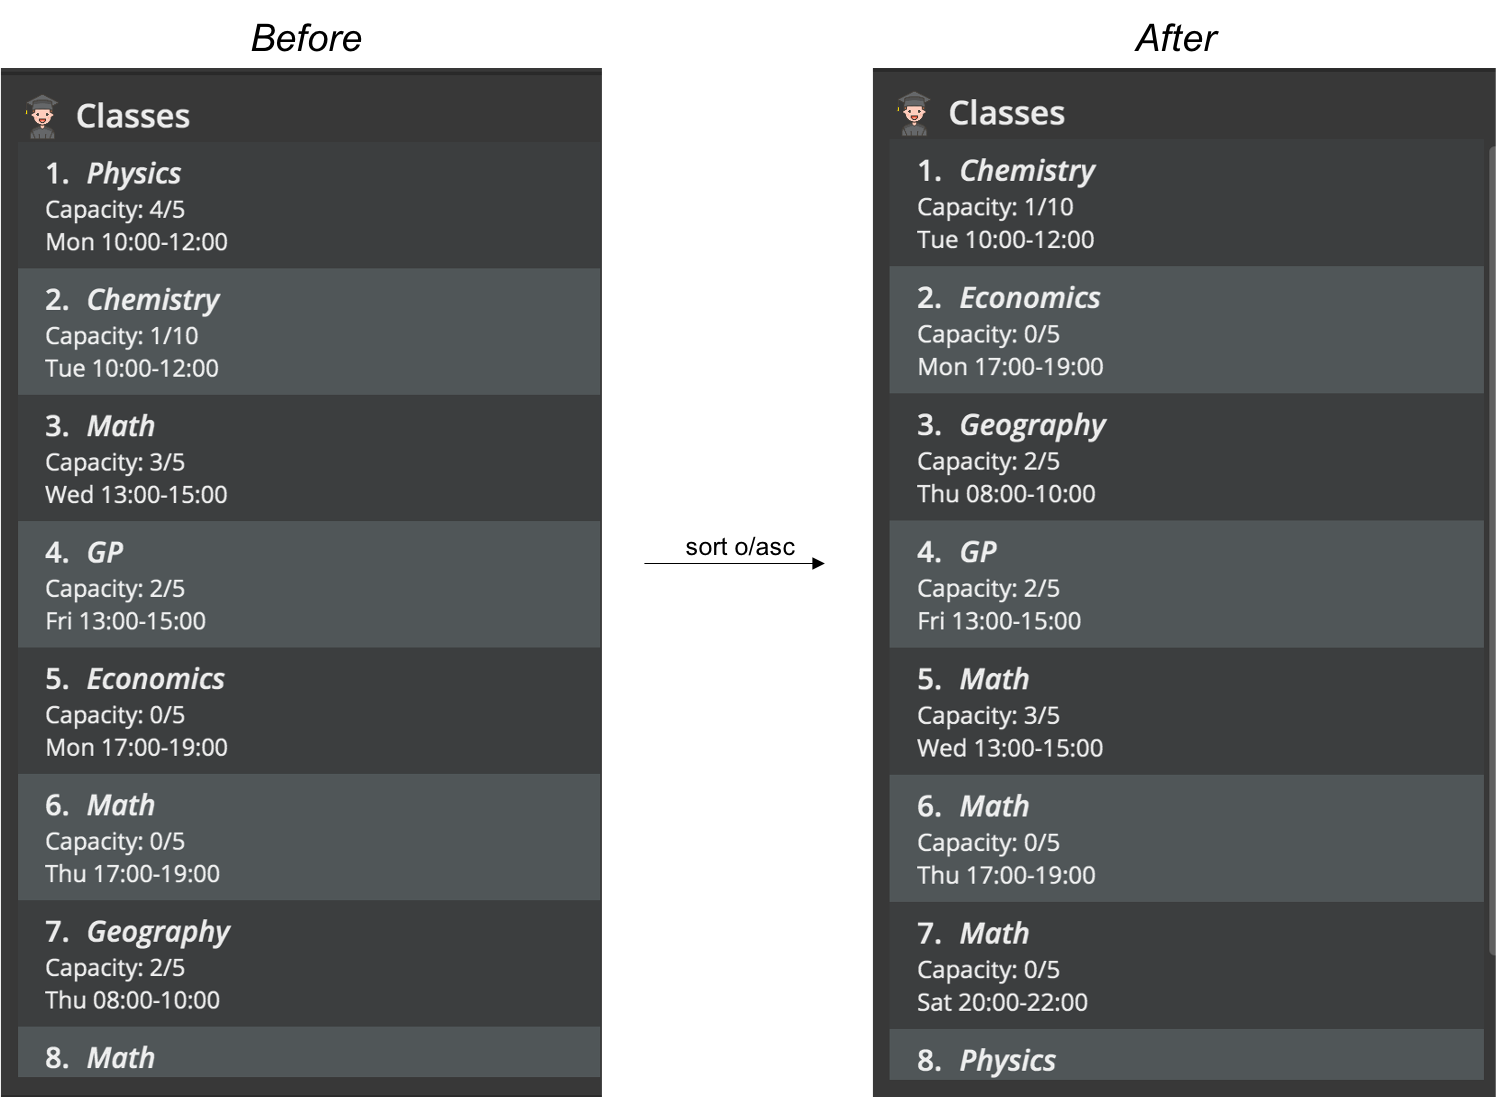
Figure 7: Example of executing `sort o/asc` command
3.10 View timetable: timetable | tt
Shows classes scheduled in this week in a timetable.
Format:
timetable
![]() Note:
Note:
If a lesson is shorter than one hour, the timetable may not display its details properly, such as using smaller font size or omitting the details completely due to limited space in the time block.
For example, in Figure 8 below, the class on Monday, 15:00-15:15 is only 15 minutes and thus not displayed with details.
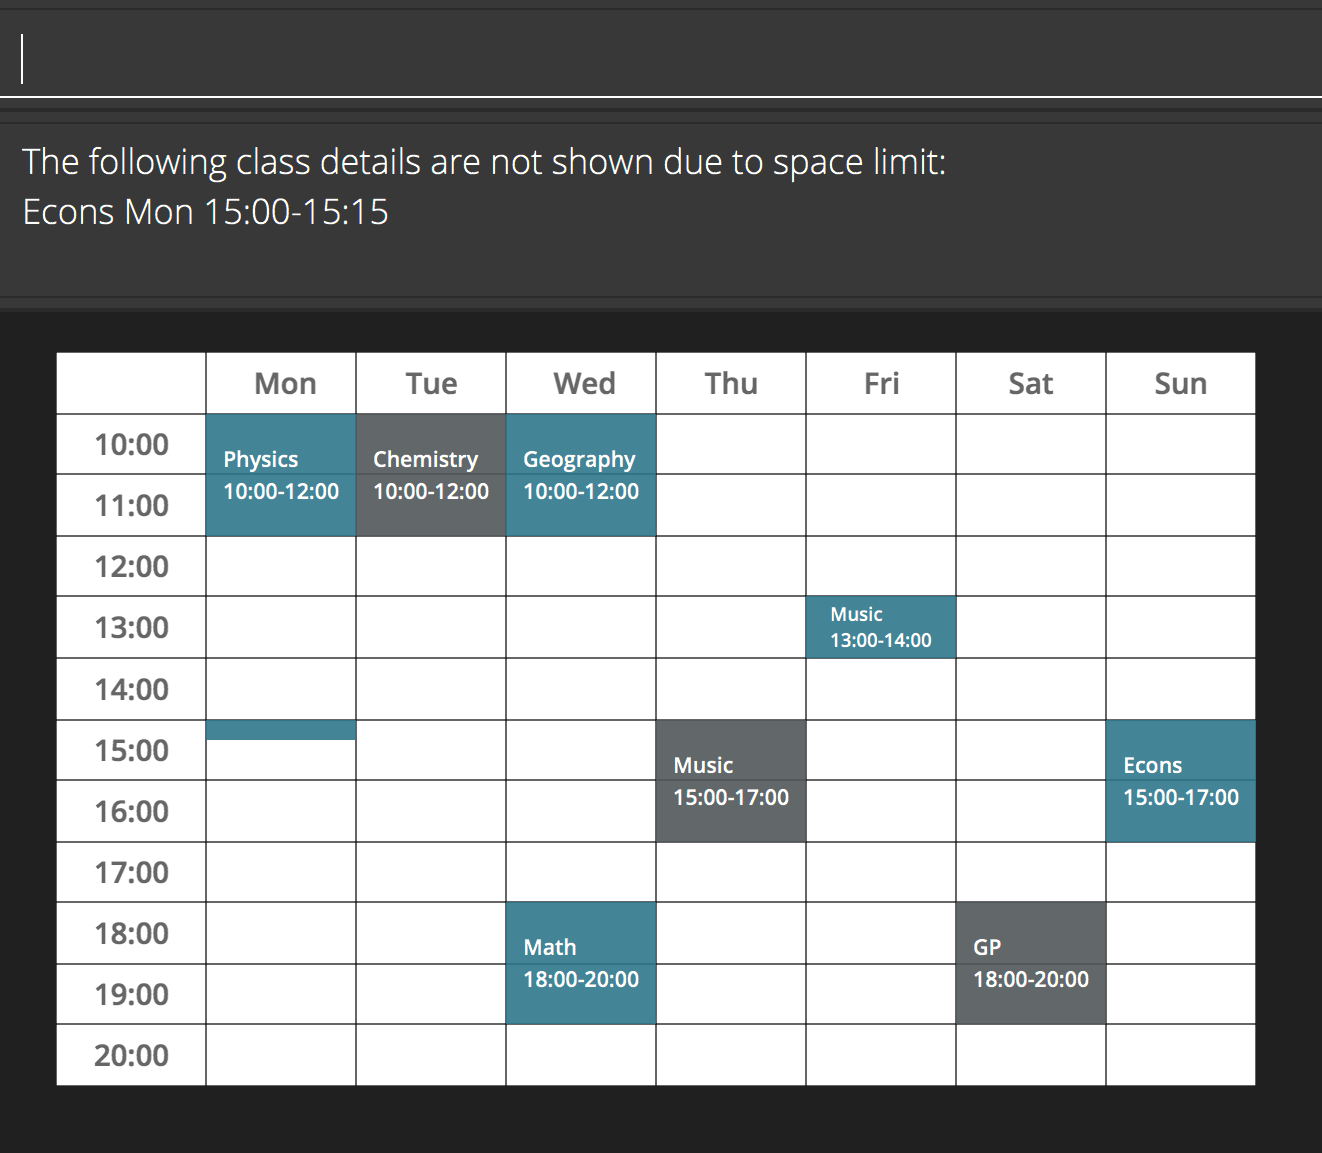
Figure 8: A timetable view of all tuition classes in a week
3.11 View today’s classes: today | td
Displays an overview of all classes happening today.
Also, a reminder of classes happening today will be displayed
when the TutAssistor is reopened.
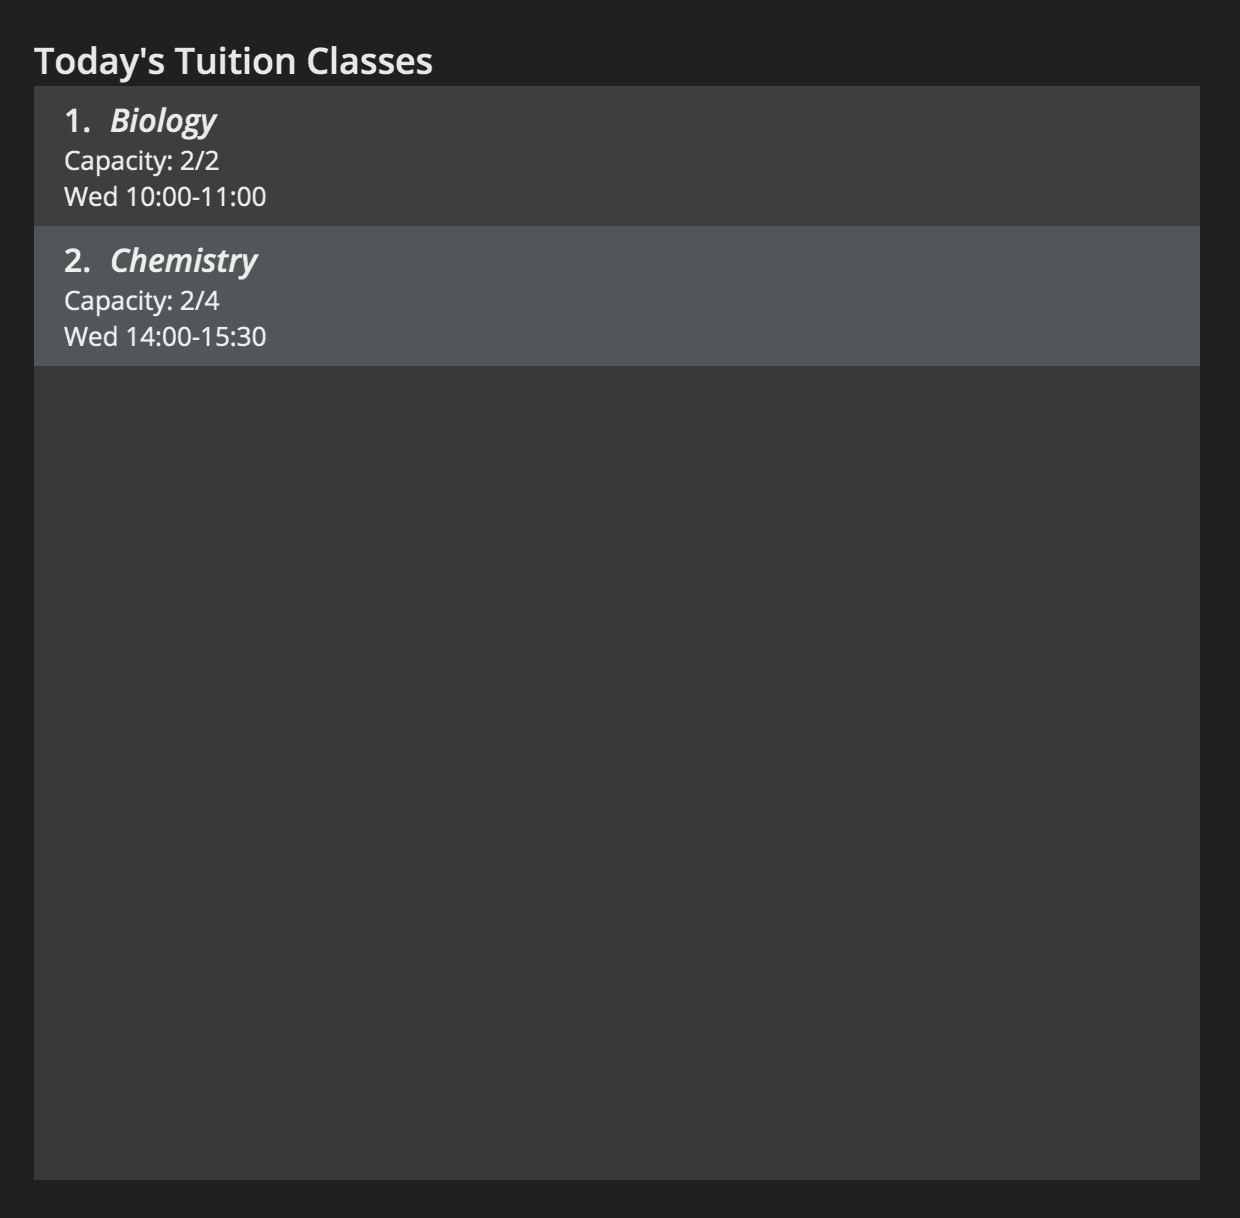
Figure 9: The view of all classes scheduled today in the Main Display Pane
3.12 View help: help | h
Shows a command summary, as well as a link to the user guide.
Format: help
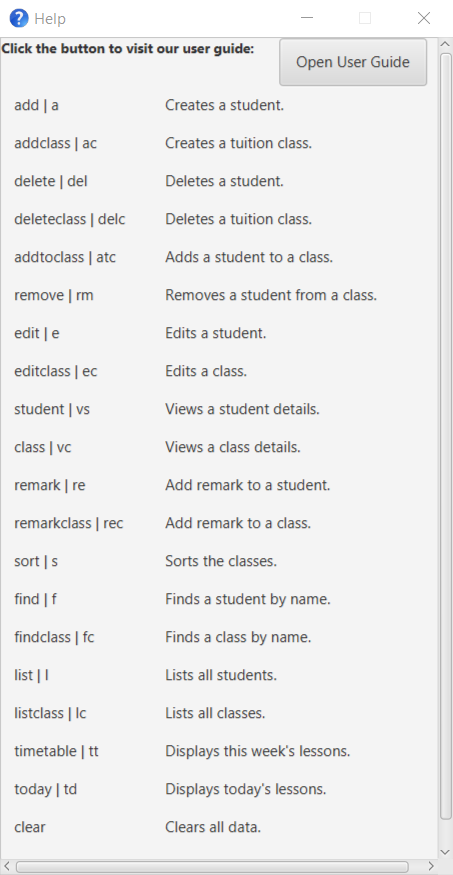
Figure 10: The help window
3.13 Navigate input history
When typing in the command box, use the up and down arrow keys to access and navigate through previously entered inputs.
3.14 Clear data: clear
Clears all current student and tuition class data.
Format: clear
3.15 Exit the app: exit
Exits the program.
Format: exit
3.16 Track payment coming in v2.0
Details coming soon…
4 Additional Command Format Information
The requirements of the various parameters used are explained below. Head back to Features to refer to general notes on the command format.
4.1 Name
Student name is unique, i.e., there cannot be 2 or more students registered with the same name. TutAssistor ignores letter case and trivial whitespaces when it checks for duplicate names.
Note that if you successfully add a student, the name will appear exactly as what you typed, including trivial whitespaces.
For example, when adding a new student, given an existing student named John Doe,
- Valid:
John Doe the Great - Invalid:
john doe,John Doe
Names for tuition classes may be reused.
For example, given an existing class named Biology, you may add a new class also named Biology.
4.2 Phone Number
Phone number should only contain digits, and should be at least 3 digits long.
4.3 Email
Email should be of the format local-part@domain and adhere to the following constraints:
- The
local-partshould only contain alphanumeric characters and these special characters,+_.-. Thelocal-partmay not start or end with any special characters. - This is followed by a
@and then adomainname. The domain name is made up of domain labels separated by periods. The domain name must:- end with a domain label at least 2 characters long
- have each domain label start and end with alphanumeric characters
- have each domain label consist of alphanumeric characters, separated only by hyphens, if any
4.4 Timeslot
Timeslot for classes follows the format:
Ddd HH:mm-HH:mm
where
-
Dddis the day of the week, abbreviated to the first three letters, with only the first letter capitalised.Examples:
- Correct:
Mon,Tue,Wed,Thu,Fri,Sat,Sun - Incorrect:
mon,tuesday,WED,Thurs,Friday, etc
- Correct:
-
HH:mmis the time with 2 digits for the hour and 2 digits for the minute. The first time must be earlier in the day than the second time.Examples:
- Correct:
09:00-14:30 - Incorrect:
9:00-14:00,9am-2pm,9-2,09:00-08:00
- Correct:
4.5 Index
Index for a student or tuition class must be a positive integer, starting from 1. It must not exceed the size of the list.
For example, if the list consists of 5 students/tuition classes:
- Correct:
1,2,3,4,5 - Incorrect:
0,1.5,a,6, etc.
5 FAQ
Q: How do I transfer my data to another Computer?
A: Install the app in the other computer and overwrite the empty data file it creates with the file that contains the data of your previous TutAssistor home folder.
Q: Do I lose all the details of classes and students when I close the application?
A: All of your data is stored locally in a file under the data folder and will be loaded upon the next entry,
hence you do not lose any data.
Q: What should I do if I am unsure of the command formats?
A: Please type help to learn the command formats.
6 Command Summary
Head back up to section 3 Features to refer to notes about the command format.
| Action | Format | Shortcut |
|---|---|---|
| Add Student | add n/NAME p/PHONE_NUMBER e/EMAIL a/ADDRESS [r/REMARK] |
a |
| Add Class | addclass n/NAME l/LIMIT ts/TIMESLOT [s/NAME,...] [r/REMARK] |
ac |
| View Student | student INDEX |
vs |
| View Class | class INDEX |
vc |
| Edit Student | edit INDEX [n/NAME] [p/PHONE] [e/EMAIL] [a/ADDRESS] |
e |
| Edit Class | editclass INDEX [n/NAME] [l/LIMIT] [ts/TIMESLOT] |
ec |
| Delete Student | delete STUDENT_INDEX [STUDENT_INDEX]... |
del |
| Delete Class | deleteclass CLASS_INDEX [CLASS_INDEX]... |
delc |
| Add Student to Class |
addtoclass si/STUDENT_INDEX [STUDENT_INDEX]... tc/CLASS_INDEXor addtoclass s/NAME[,NAME...] tc/CLASS_INDEX
|
atc |
| Remove Students from Class | remove si/STUDENT_INDEX [STUDENT_INDEX]... tc/CLASS_INDEX |
rm |
| Add Remarks to Student | remark STUDENT_INDEX |
re |
| Add Remarks to Class | remarkclass CLASS_INDEX |
rec |
| Find Student by Name | find KEYWORD [KEYWORD]... |
f |
| Find Class by Name | findclass KEYWORD [KEYWORD]... |
fc |
| List all Students | list |
l |
| List all Classes | listclass |
lc |
| Sort Tuition Class | sort [o/ORDER] |
s |
| View Timetable | timetable |
tt |
| View Today’s Classes | today |
td |
| Help | help |
h |
| Clear all data | clear |
- |
| Exit | exit |
- |