Developer Guide
- Acknowledgements
- Setting up, getting started
- Design
-
Implementation
- [Developed] Time conflict management
- [Developed] Display of Timetable
- [Developed] Adding Remarks With Editor
- [Developed] CLI input history navigation
- [Developed] Editing a Student
- [Developed] Editing Tuition Classes
- [Developed] Deleting Students
- [Developed] Deleting Tuition Classes
- [Developed] Removing Students from Tuition Classes
- [Developed] Adding Students to Existing Tuition Classes
- [Proposed] Undo/redo feature
- Documentation, logging, testing, configuration, dev-ops
- Appendix: Requirements
- Appendix: Instructions for manual testing
Acknowledgements
- This software is built upon SE-EDU’s AddressBook Level-3 project.
- The CLI History Navigation feature was inspired by YaleChen299’s ip for CS2103T, though its implementation in this project is new.
- Implementation of opening User Guide in user’s browser feature referenced from samyipsh’s tP for CS2103T.
Setting up, getting started
Refer to the guide Setting up and getting started.
Design
Architecture

The Architecture Diagram given above explains the high-level design of the App.
Given below is a quick overview of main components and how they interact with each other.
Main components of the architecture
Main has two classes called Main and MainApp. It is responsible for,
- At app launch: Initializes the components in the correct sequence, and connects them up with each other.
- At shut down: Shuts down the components and invokes cleanup methods where necessary.
Commons represents a collection of classes used by multiple other components.
The rest of the App consists of four components.
-
UI: The UI of the App. -
Logic: The command executor. -
Model: Holds the data of the App in memory. -
Storage: Reads data from, and writes data to, the hard disk.
How the architecture components interact with each other
The Sequence Diagram below shows how the components interact with each other for the scenario where the user issues the command delete 1.

Each of the four main components (also shown in the diagram above),
- defines its API in an
interfacewith the same name as the Component. - implements its functionality using a concrete
{Component Name}Managerclass (which follows the corresponding APIinterfacementioned in the previous point.)
For example, the Logic component defines its API in the Logic.java interface and implements its functionality using the LogicManager.java class which follows the Logic interface. Other components interact with a given component through its interface rather than the concrete class (reason: to prevent outside component’s being coupled to the implementation of a component), as illustrated in the (partial) class diagram below.

The sections below give more details of each component.
UI component
The API of this component is specified in Ui.java

The UI consists of a MainWindow that is made up of parts e.g.CommandBox, ResultDisplay, StudentListPanel, StatusBarFooter etc. All these, including the MainWindow, inherit from the abstract UiPart class which captures the commonalities between classes that represent parts of the visible GUI.
The UI component uses the JavaFx UI framework. The layout of these UI parts are defined in matching .fxml files that are in the src/main/resources/view folder. For example, the layout of the MainWindow is specified in MainWindow.fxml
The UI component,
- executes user commands using the
Logiccomponent. - listens for changes to
Modeldata so that the UI can be updated with the modified data. - keeps a reference to the
Logiccomponent, because theUIrelies on theLogicto execute commands. - depends on some classes in the
Modelcomponent, as it displaysStudentobject residing in theModel.
Logic component
API : Logic.java
Here’s a (partial) class diagram of the Logic component:

How the Logic component works:
- When
Logicis called upon to execute a command, it uses theAddressBookParserclass to parse the user command. - This results in a
Commandobject (more precisely, an object of one of its subclasses e.g.,AddCommand) which is executed by theLogicManager. - The command can communicate with the
Modelwhen it is executed (e.g. to add a student). - The result of the command execution is encapsulated as a
CommandResultobject which is returned back fromLogic.
The Sequence Diagram below illustrates the interactions within the Logic component for the execute("delete 1") API call.

DeleteCommandParser should end at the destroy marker (X) but due to a limitation of PlantUML, the lifeline reaches the end of diagram.
Here are the other classes in Logic (omitted from the class diagram above) that are used for parsing a user command:

How the parsing works:
- When called upon to parse a user command, the
AddressBookParserclass creates anXYZCommandParser(XYZis a placeholder for the specific command name e.g.,AddCommandParser) which uses the other classes shown above to parse the user command and create aXYZCommandobject (e.g.,AddCommand) which theAddressBookParserreturns back as aCommandobject. - All
XYZCommandParserclasses (e.g.,AddCommandParser,DeleteCommandParser, …) inherit from theParserinterface so that they can be treated similarly where possible e.g, during testing.
Model component
API : Model.java

The Model component,
- stores the address book data i.e., all
Studentobjects (which are contained in aUniqueStudentListobject). - stores the currently ‘selected’
Studentobjects (e.g., results of a search query) as a separate filtered list which is exposed to outsiders as an unmodifiableObservableList<Student>that can be ‘observed’ e.g. the UI can be bound to this list so that the UI automatically updates when the data in the list change. - stores a
UserPrefobject that represents the user’s preferences. This is exposed to the outside as aReadOnlyUserPrefobjects. - does not depend on any of the other three components (as the
Modelrepresents data entities of the domain, they should make sense on their own without depending on other components)
Tag list in the AddressBook, which Student references. This allows AddressBook to only require one Tag object per unique tag, instead of each Student needing their own Tag objects.

Storage component
API : Storage.java

The Storage component,
- can save both address book data and user preference data in json format, and read them back into corresponding objects.
- inherits from both
AddressBookStorageandUserPrefStorage, which means it can be treated as either one (if only the functionality of only one is needed). - depends on some classes in the
Modelcomponent (because theStoragecomponent’s job is to save/retrieve objects that belong to theModel)
Common classes
Classes used by multiple components are in the seedu.addressbook.commons package.
Implementation
This section describes some noteworthy details on how certain features are implemented.
[Developed] Time conflict management
The time conflict management mechanism is facilitated by TimeSlot. It is encapsulated in Tuition package which
defines time slot format, checks time slot format and manage time conflict. It implements the following operations:
-
Timeslot#checkClassConflict()- Compares two time slots to detect time conflict -
Timeslot#parseString()- Parses the String to check the format of the String and creates a newTimeslotif the format is correct
Given below is an example usage scenario and how the time conflict management mechanism behaves at each step.
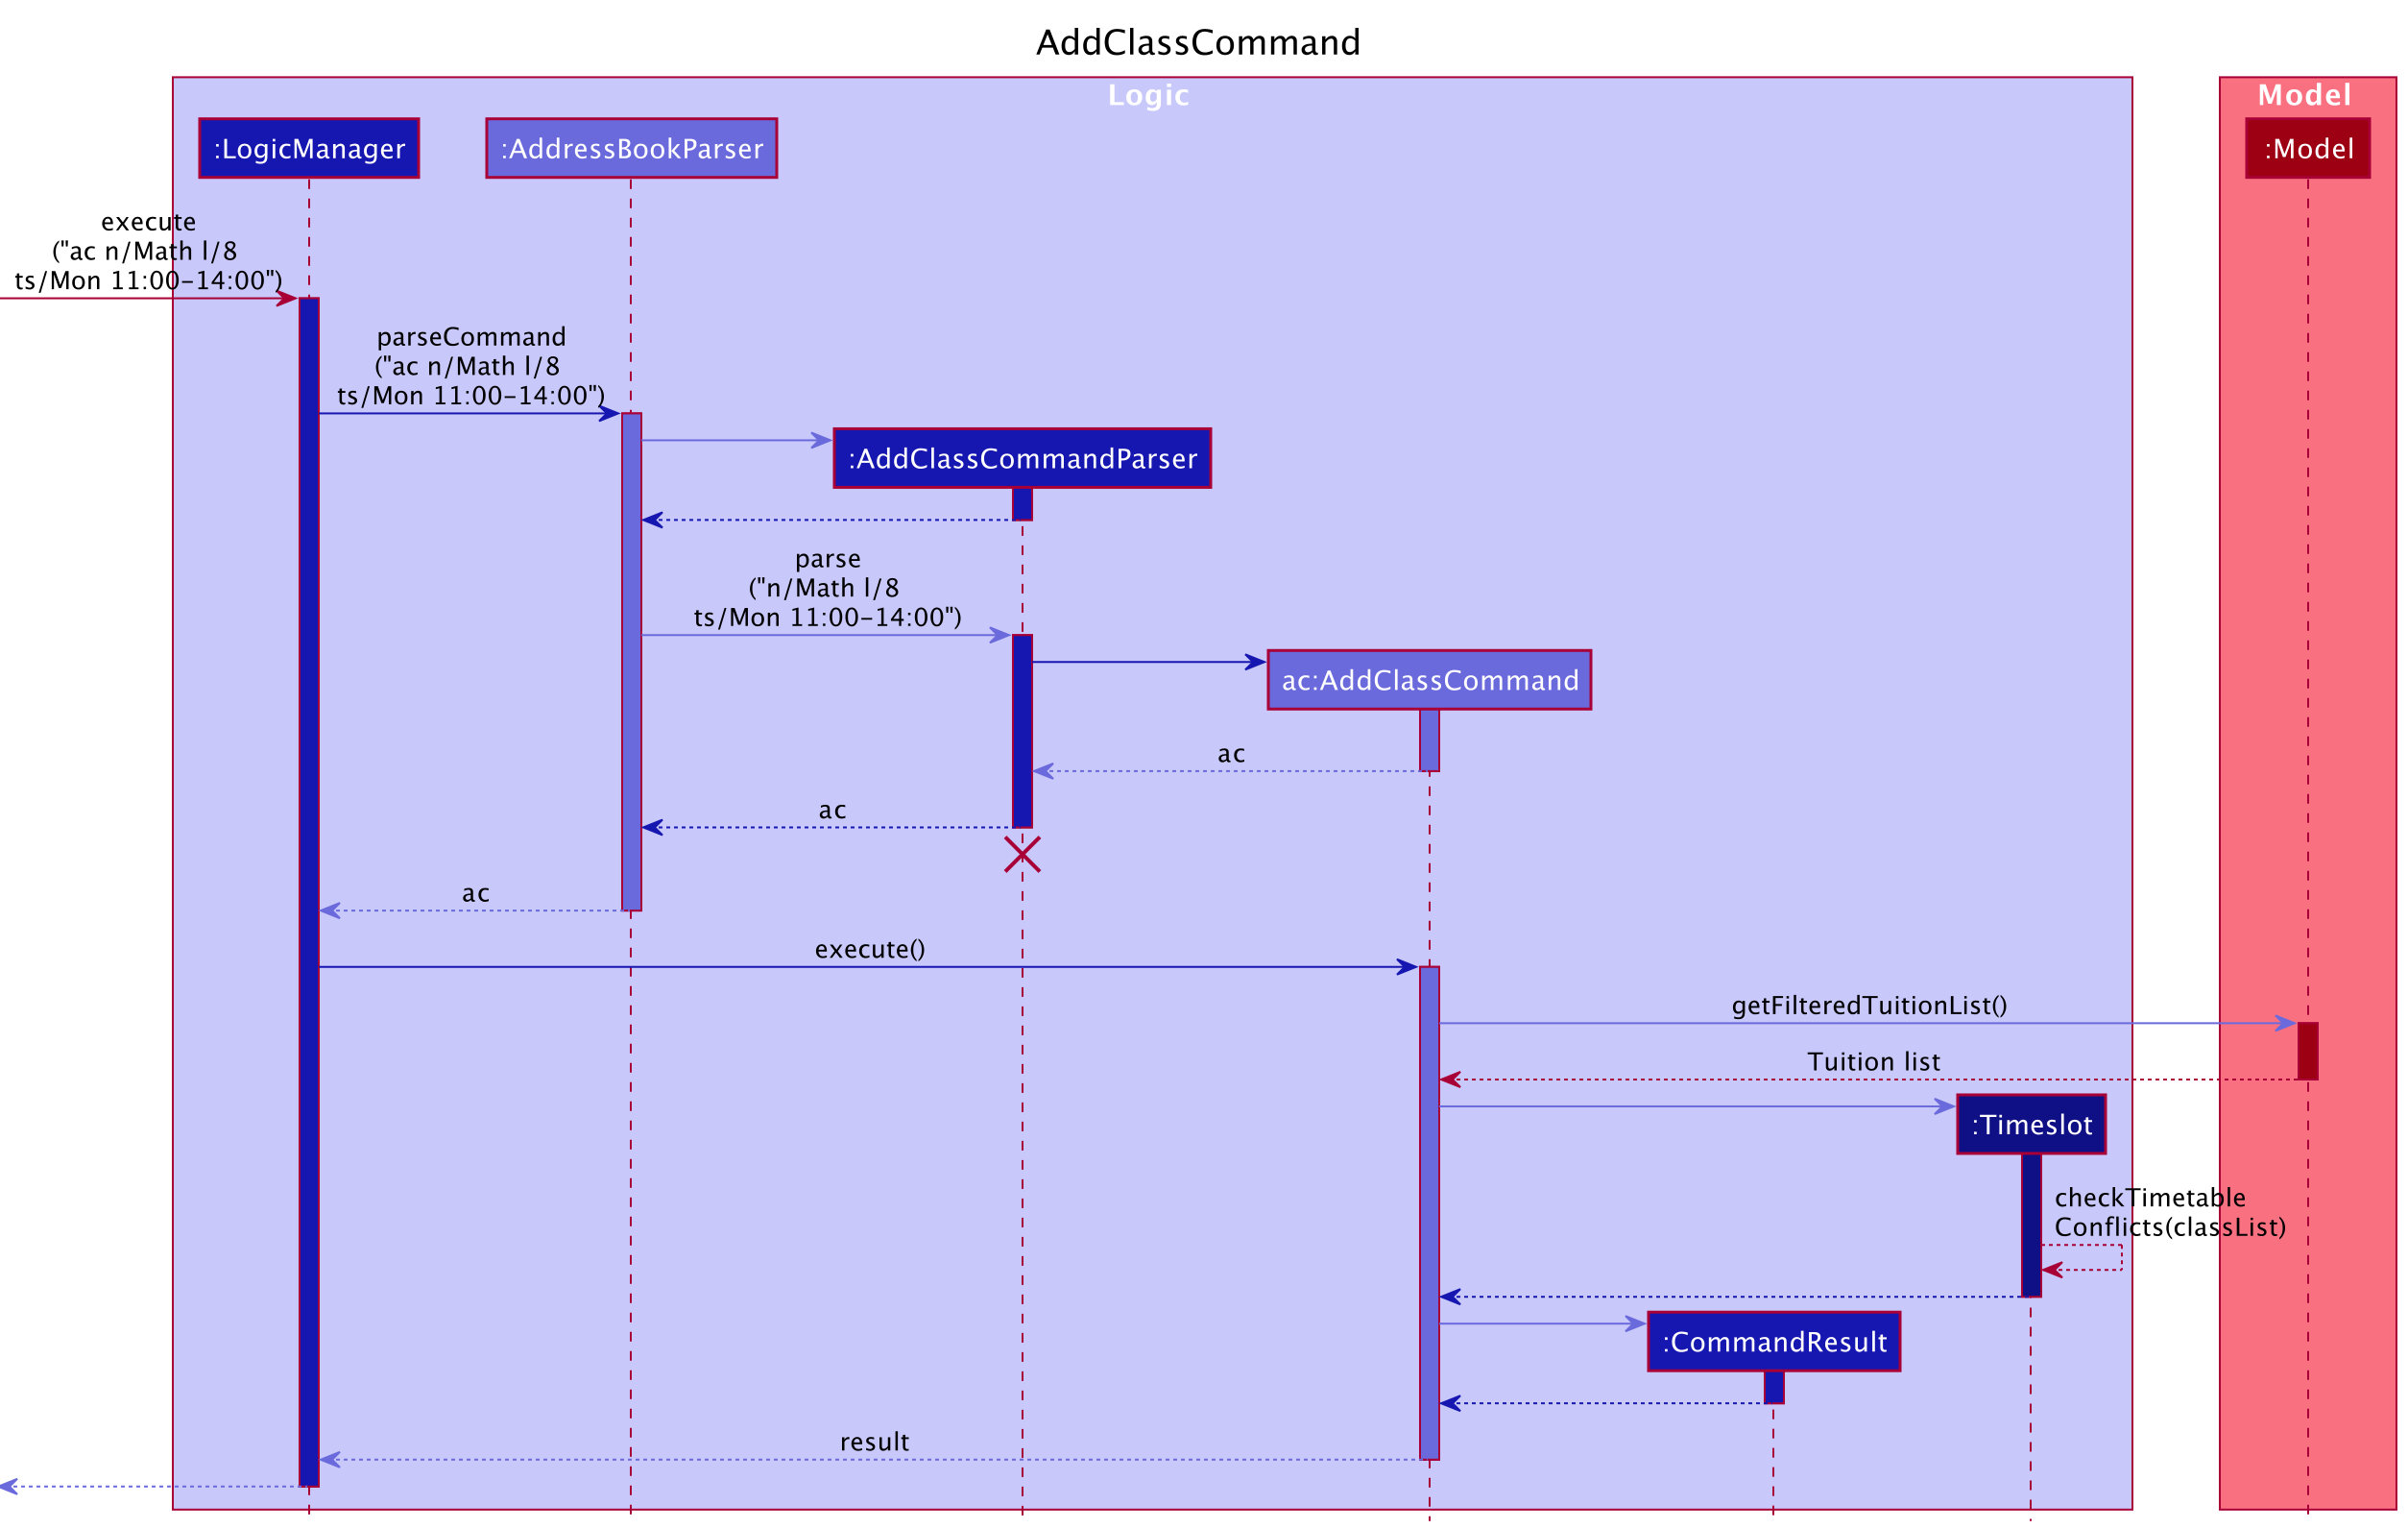
Step1: The user enters addclass command. The Timeslot will check the correctness of the format of the
time slot entered by user through Timeslot#parseString(). If it is incorrect, a ParseException will be thrown, and the
exception will be handled by throwing IllegalValueException. Then user will receive a guidance to correct the time slot format.
Step2: After confirmed the time slot format is correct, TuitionClass will check whether there is a conflict in
time slot exists. If there is a conflict, a CommandException will be thrown.
Step3: If time slot follows the format and no conflict exist, a new TuitionClass will be created
The interactions between the components during the usage scenario is show in the Sequence Diagram below.
[Developed] Display of Timetable
The construction of the read-only timetable is facilitated by the Timetable class in the Tuition package.
The Timetable receives an updated tuitionClassList from UniqueTuitionList, and then processes the TimeSlot occupied by each TuitionClass to construct a timetable.
It generates a timetable with the help of the TimetableInfoPage class using the following operations:
-
Timetable#parseTime()- ExtractsTimeSlotoccupied by eachTuitionClass. Determines the size of the timetable using the earliest starting time and latest ending time of the tuition class list. -
TimetableInfoPage#setTableTime(start, end)- Constructs a timetable given the starting and ending time. -
Timetable#insertSlot()- Inserts all tuition classes into the timetable. -
TimetableInfoPage#addLesson(lesson, columnStartInsert, rowStartInsert, columnSpan, rowSpan)- Inserts a lesson to the corresponding rows and columns of the timetable.
Timetable class is responsible for processing data of the tuitionClassList and determining the details of timetable.
And operations in the TimetableInfoPage class interact with UI to construct the timetable according to details provided by the Timetable class.
Given below is an example usage scenario of how the timetable is generated.
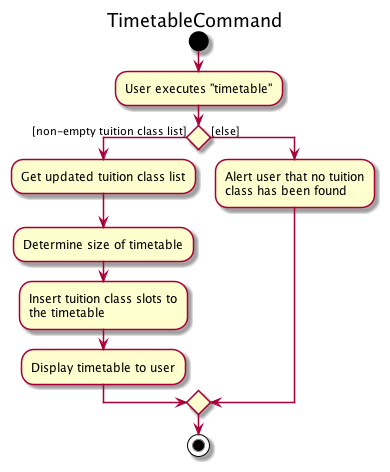
Step1: The user executes timetable command to view a read-only timetable.
Step2: The TimetableCommand class checks whether the mostRecentTuitionClasses maintained in UniqueTuitionList is empty.
Step2.1: If there is not any tuition class, a CommandResult will be returned to alert the user that no class has been found.
Step2.2: Otherwise, the mostRecentTuitionClasses in UniqueTuitionList is passed to the Timetable class as a tuitionClassList.
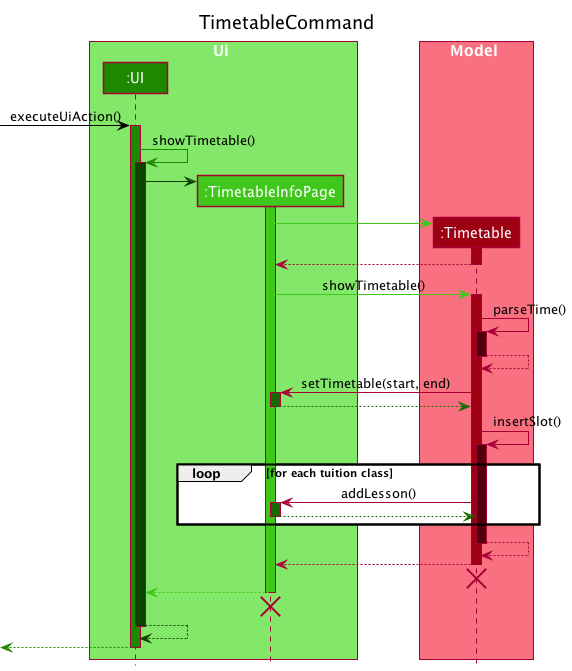
Step3: Timetable will proceed to parse the TimeSlot in all tuition classes using Timetable#parseTime().
After comparing the time when each TuitionClass takes place, the time range and thus the size of the timetable to be produced can be decided.
The intended size of timetable is then passed to the TimetableInfoPage class by calling TimetableInfoPage#setTableTime(start, end).
Step4: After the construction of the timetable, each TuitionClass is inserted into the timetable by calling TimetableInfoPage#addLesson.
The following Sequence Diagram illustrates how Timetable interacts with TimetableInfoPage as explained by step 3 and step 4:
Step5: The complete timetable is displayed to user through the UI component.
The following Activity Diagram summarizes what happens when a user executes a “timetable” command:
Design considerations
Aspect: Size of timetable:
-
Alternative 1 (current choice): Change the size of timetable according to lessons added.
- Pros: Easier for users to view lessons scheduled.
- Cons: May produce a timetable at a slightly slower speed and is more prone to bugs.
-
Alternative 2: Fix the size of timetable.
- Pros: Easy to implement.
- Cons: User experience would be compromised as the timetable will include many empty slots.
[Developed] Adding Remarks With Editor
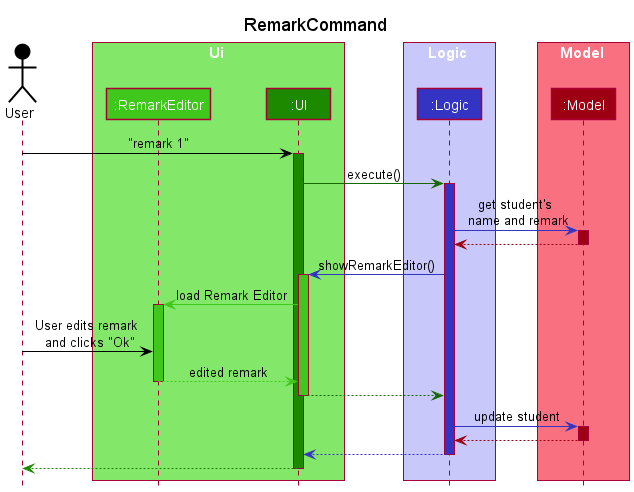
Users can add, edit, or remove remarks for students or tuition classes, which is facilitated by RemarkEditor. The UIManager displays a dialog box with a text area for users to type in the description of the remark. Additionally, the RemarkEditor supports the following operations:
-
RemarkEditor#setRemark(name, remark)— Sets the name and remark of the identified student or tuition class. -
RemarkEditor#getRemark()— Retrieves the description input by the user as aRemark.
The interactions between the components during the execution of the RemarkCommand is show in the Sequence Diagram below. The interactions and execution paths for RemarkClassCommand are the same.
Given below is an example usage scenario of how a user can interact with the RemarkEditor dialog.
Step 1. The user executes remark 1 to edit the remark of the 1st student. A dialog box pops up for the user to edit the remark description.
Step 2.1. The user clicks Ok and the remark for the student is automatically updated to the new description.
Step 2.2 The user may choose to click Cancel or exit the dialog box and the remark will remain unchanged.
[Developed] CLI input history navigation
Users are able to navigate through their previously entered inputs from the Command Box in the UI,
using the ↑up and ↓down arrow keys.
This is facilitated by the InputHistory class.
Current Implementation
The InputHistory class consists of an ArrayList<String> and an int which serves as a pointer/position marker for navigation through the list.
The CommandBox object in UI has an InputHistory object when initialized.
When Users enter a non-empty String into the Command Box and press the Enter key, the text entered will be added to its InputHistory.
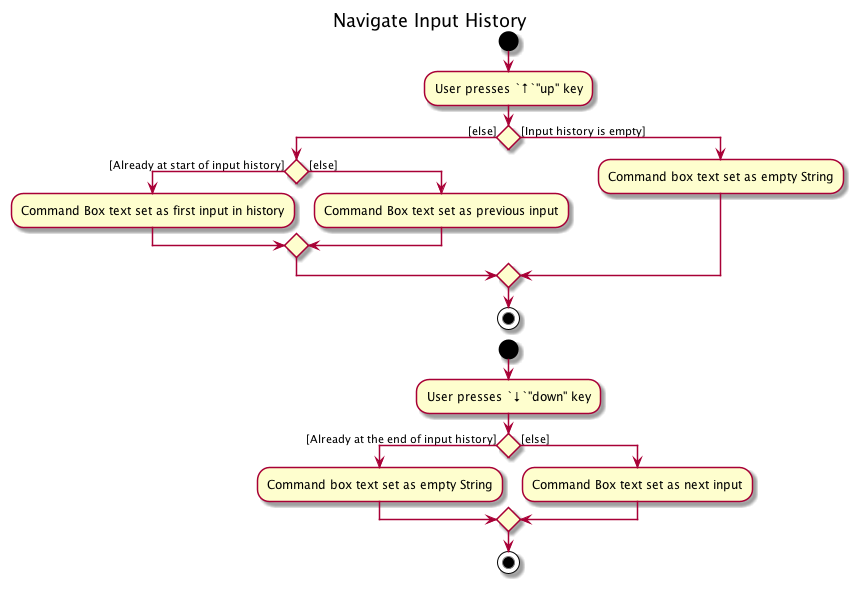
When interacting with the Command Box, Users can press the ↑up or ↓down keys on their keyboard.
This event is detected and handled by CommandBox and previous inputs can be navigated. This is facilitated by the following methods:
-
CommandBox#handleButtonPressed(KeyEvent)- Handles events of Users pressing arrow keys. -
InputHistory#add(String)- Adds a given String to a list if the String is not equal to the last String added to the list. Resets the navigation position to the end of the list. -
InputHistory#getPreviousInput()- Returns the String stored just before the current pointer position in the list.- If list is empty, returns an empty String.
- If the pointer is already at the start of the list, returns first String in the list.
-
InputHistory#getNextInput()- Returns the String stored just after the current pointer position in the list.- If the pointer is already at the end of the list, returns an empty String.
The activity diagram below shows the work flow of how input history is navigated.
Given below is an example usage scenario of how CLI history may be used.
Steps
Step 1: When the User launches TutAssistor, CommandBox creates a new InputHistory with an empty list.
Step 2: The User types addclass n/Chemistry l/2 ts/Mon 12:00-13:00 into the Command Box and presses the Enter key.
Step 3: As the input is not an empty String, CommandBox passes the given User input to InputHistory as a String via the InputHistory#add(String) method.
Step 4: Since InputHistory’s ArrayList<String> is empty, the input is not equal to the last added String.
InputHistory#add(String) adds the input to the ArrayList<String> and sets the pointer to the end of the list.
Step 5: The User presses the ↑up key on their keyboard.
Step 6: The key press event is detected by CommandBox#handleButtonPressed(KeyEvent). InputHistory#getPreviousInput() is called.
As the input history list is not empty, and the current pointer position is not at the start of the list, "addclass n/Chemistry l/2 ts/Mon 12:00-13:00" is returned.
Step 7: The text in the Command Box UI is set to addclass n/Chemistry l/2 ts/Mon 12:00-13:00.
Acknowledgement
This feature was inspired by a similar feature in YaleChen299’s ip for CS2103T, though its implementation in this project is new.
[Developed] Editing a Student
Users can edit a student by editing the following fields: Name, Phone, Email and Address.
This is implemented using the EditCommand, EditStudentDescriptor and EditCommandParser classes.
Current Implementation
The EditCommand receives an index that indicates the student to be edited and an
editable EditStudentDescriptor class which consists of the updated fields of the student.
The student is then updated with the help of the following methods:
-
Student#sameStudent(Student)- Checks if the name of the student has been changed. -
ModelManager#hasStudent(Student)- Checks if the updated name already exists in the database. -
Student#equals(Student)- Checks if any of the four fields have been changed. -
TuitionClass#updateStudent(Student)- Updates the student’s name in the class. -
ModelManager#setStudent(Student)- Updates the student’s details in database.
Given below is an example usage scenario of how an edit command is executed.
Steps
Step 1: The user enters edit 1 n/Tom p/98989898 command.
Step 2: The EditCommandParser parses the student index to ensure that it is valid.
Step 3: An EditStudentDescriptor object is constructed.
The EditCommandParser parses the arguments for the n/ and p/ prefixes to ensure that the arguments are valid.
If the arguments are valid, the EditStudentDescriptor object is then updated with the relevant values - namely
the edited values for Phone and Name as well as the existing values for the Email and Address fields.
Step 4: An EditCommand object is then constructed with the student index and the EditStudentDescriptor object.
Step 5: The EditCommand object checks if any of the fields have been updated using Student#equals(Student). If none of the four fields are updated a CommandException is thrown to alert the user that the details are up-to-date.
Step 6: Otherwise, it proceeds to check if the student name has been changed using Student#sameStudent(Student). If the name has been changed, it ensures that the name does not exist in the database using ModelManager#hasStudent(Student).
Step 7: If the updated name is valid, the name of the student is updated in all the tuition classes he/she is enrolled in using TuitionClass#updateStudent(Student).
Step 8: Finally, the student is updated in the database using ModelManager#setStudent(Student).
[Developed] Editing Tuition Classes
Users can edit tuition classes by editing the following fields: limit, name and timeslot of a class.
This is implemented using the EditClassCommand, EditClassDescriptor and EditClassCommandParser classes.
Current Implementation
Similar to EditCommand, the EditClassCommand receives an index that indicates the class to be edited and an editable EditClassDescriptor class which contains the updated fields of the class.
The tuition class is then updated with the help of the following methods:
-
TuitionClass#sameClassDetails()- Checks if any field of the tuition class has been updated. -
Timeslot#checkTimetableConflicts- Checks if the updated time slot has been taken or overlaps with another class’s timeslot. -
ModelManager#setTuition(TuitionClass, TuitionClass)- Updates the tuition class.
Given below is an example usage scenario of how an editclass command is executed.
Steps
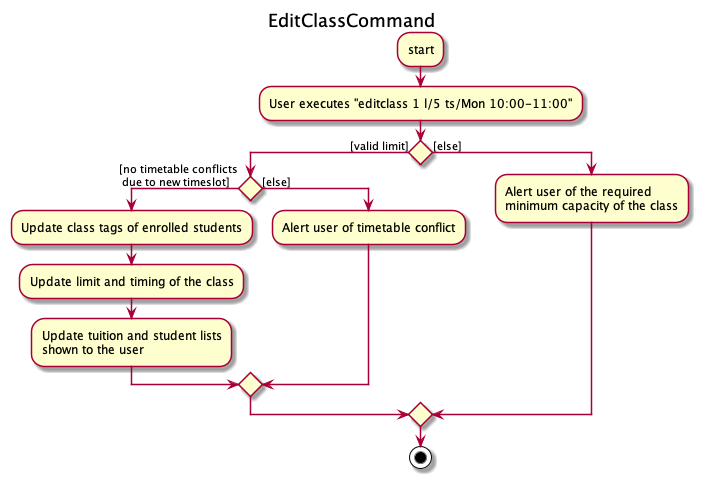
Step 1: The user enters editclass 1 l/5 ts/Mon 10:00-11:00 command.
Step 2: The EditClassCommand class will first check if any field of the tuition class has been updated using TuitionClass#sameClassDetails().
If there are no changes, a CommandException will be thrown to alert the user that the class details are up-to-date.
Otherwise, it proceeds to verify that the updated limit is at least equal to the current number of students.
Step 3: Upon ensuring that the limit is valid, it checks for potential conflicts by comparing the updated timeslot
against those of other classes using the Timeslot#checkTimetableConflicts method.
If there are conflicts, a CommandException will be thrown to the user to alert the class that the slot has been taken.
Step 4: If there are no conflicts, the class tag of the students enrolled in the class which shows the ClassName andTimeslot of the updated class.
Step 5: Finally, it replaces the existing class with the updated class in the database using ModelManager#setTuition(TuitionClass, TuitionClass).
Activity Diagram
The user flow is shown in the Activity Diagram below.
[Developed] Deleting Students
This feature allows students to be deleted using the deletestudent or del command.
This is facilitated by the DeleteStudentCommand and DeleteStudentCommandParser classes.
Current Implementation
The DeleteStudentCommandParser parses the input from user to ensure that the student indices are valid. Then,
students are removed from the database with the help of the following methods:
-
ModelManager#getStudent(Student)- Retrieves theStudentindicated by its index fromUniqueStudentList. -
TuitionClass#removeStudent(Student)- Removes the student’s name from theStudentListof the class. -
ModelManager#getStudent(Student)- Deletes theStudentindicated by its index fromUniqueStudentList.
Given below is an example usage of how a DeleteStudentCommand is executed.
Steps
Step 1: The user enters deletestudent 1 2 command.
Step 2: The DeleteStudentCommandParser will parse the student indices to ensure that they are valid.
Additionally, the parser removes any duplicates among the student indices and sorts the indices in descending order.
ObservableList that tracks the changes to the list while students are being deleted.
A DeleteStudentCommand object with the student indices as arguments is constructed.
Step 3: The DeleteStudentCommand is executed. Student indices - 1 and 2, are used to retrieve the students by calling the ModelManager#getStudent(Index) method.
If the student exists, then the student is deleted by calling ModelManager#getStudent(Student).
Step 4:CommandResult is returned informing the user of the students that have been deleted successfully.
[Developed] Deleting Tuition Classes
This feature allows tuition classes to be deleted using the deleteclass or delc command.
This is facilitated by the DeleteClassCommand and DeleteClassCommandParser classes.
Current Implementation
The DeleteClassCommandParser parses the input from user to ensure that the class indices are valid. Then,
classes are removed from the database with the help of the following methods:
-
ModelManager#getTuitionClass(Index)- Retrieves theTuitionClassindicated by its index fromUniqueTuitionList. -
Student#removeClass(TuitionClass)- Removes the class identified by an internal id and the class tag from the enrolled students. -
ModelManager#deleteTuition(TuitionClass)- Removes the tuition class fromUniqueTuitionList.
Given below is an example usage of how a DeleteClassCommand is executed.
Steps
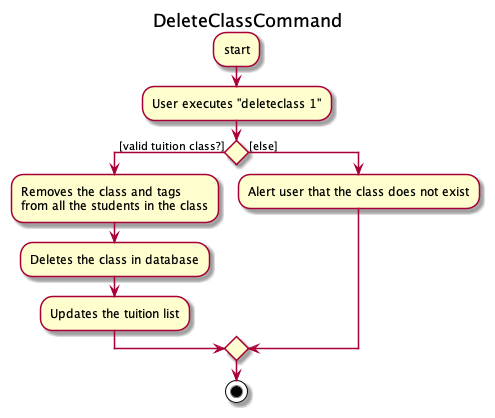
Step 1: The user enters deleteclass 1 command.
Step 2: The DeleteClassCommandParser will parse the class index to ensure that it is valid. A DeleteClassCommand object with the class index as arguments is constructed.
Step 3: The DeleteClassCommand is executed. Class index - 1, is used to retrieve the class by calling the ModelManager#getTuitionClass(Index) method.
Step 4: If the tuition class exists, Student#removeClass(TuitionClass) is called to remove the Tuition class using its id from the all the students.
It also removes the class tag for all the enrolled students by using the ClassName and unique TimeSlot of the tuition class.
Step 5: ModelManager#deleteTuition(TuitionClass) to delete the tuition class and update the list of tuition classes accordingly.
Step 6: CommandResult is returned informing the user of the classes that have been deleted successfully.
Activity Diagram
The user flow is shown in the Activity Diagram below.
[Developed] Removing Students from Tuition Classes
This feature allows students enrolled in existing classes to be removed using student indices and a class index using the remove command.
This is facilitated by the RemoveStudentCommand and RemoveStudentCommandParser classes.
Current Implementation
The RemoveStudentCommandParser parses the input from user to ensure that the indices are valid. Then,
students are removed from the respective tuition class with the help of the following methods:
-
TuitionClass#containsStudent(Student)- Checks if the student is enrolled in the class. -
TuitionClass#removeStudent(Student)- Removes an existing student from a class. -
RemoveStudentCommand#updateInvalidStudents(Student)- Updates the list of invalid students who do not exist in the class.
Given below is an example usage of how a RemoveStudentCommand is executed.
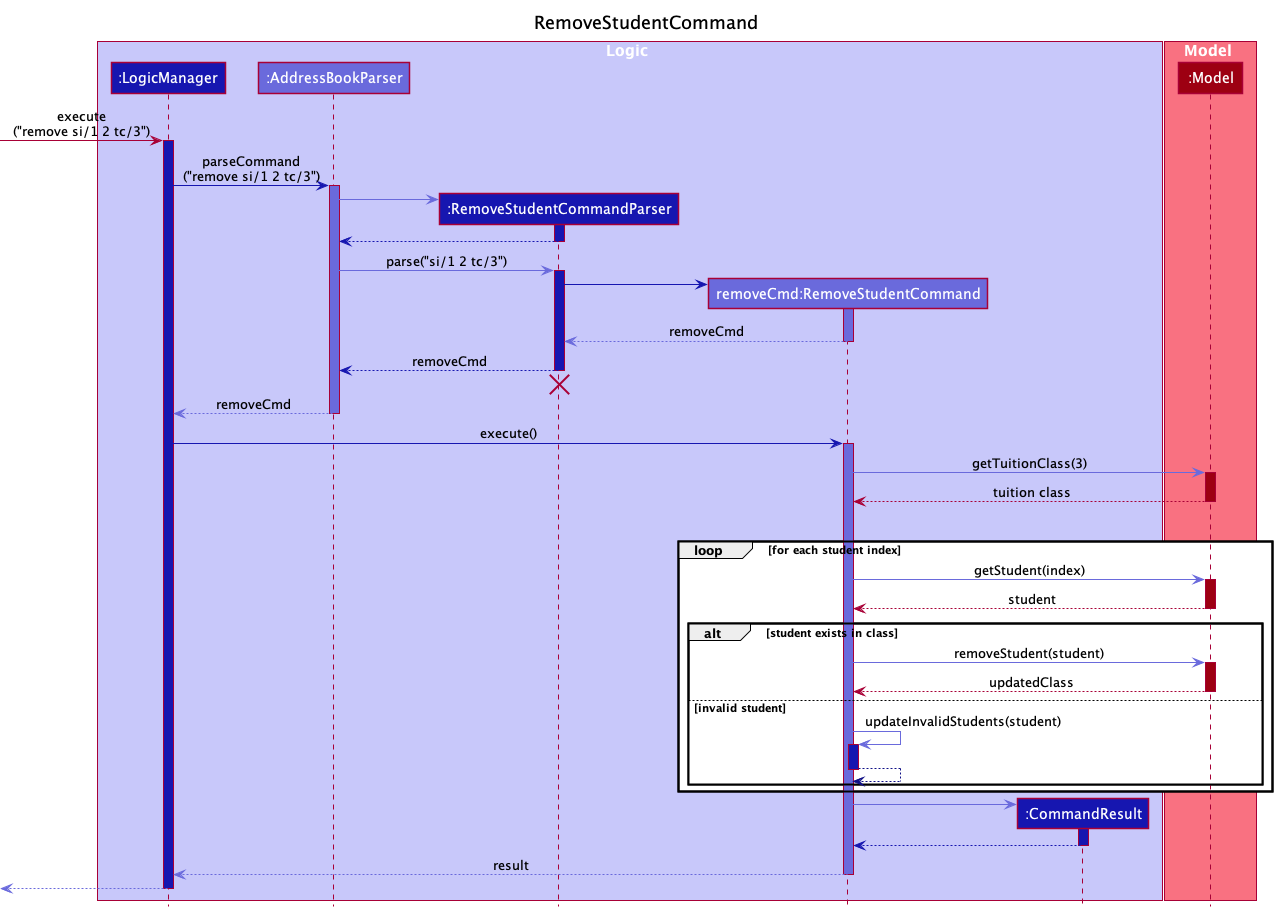
Sequence Diagram
The following sequence diagram shows the interactions between the components when the RemoveStudentCommand is executed.
Steps
Step 1: The user enters remove si/1 4 tc/1 command.
Step 2: The RemoveStudentCommandParser will parse the student indices and class index to ensure that they are valid.
Additionally, it removes any duplicates among the student indices. A RemoveStudentCommand object with the student indices and class index as arguments is constructed.
Step 3: The RemoveStudentCommand is executed. Student indices - 1 and 2, are used to retrieve the unique student names using the UniqueStudentList.
Step 4: TuitionClass#containsStudent(Student) is called to confirm that the student exists in the class.
Step 5: If the student exists, the student is removed from the class using TuitionClass#removeStudent(Student). The tuition class is also removed the particular student using
Student#removeClass(TuitionClass). Otherwise, the names of the invalid students are tracked using RemoveStudentCommand#updateInvalidStudents(Student)
Step 6: CommandResult is returned informing the user of both the students that have been removed successfully and the students who could not be removed as they do not exist in the tuition class.
Design considerations
Aspect: Whether to allow users to remove single or multiple students at once:
-
Alternative 1 (current choice): Allows multiple students to be removed.
- Pros: More efficient for users to remove students from tuition classes.
- Cons: More bug-prone due to parsing errors or duplicate indices. This is later resolved by providing more specific instructions in user guide and detailed command feedback in TutAssistor.
-
Alternative 2: Allows only one student to be removed.
- Pros: Easy to implement and reduced possibility of parsing errors.
- Cons: Users who wish to mass-update class enrollment will find it inefficient.
[Developed] Adding Students to Existing Tuition Classes
Users can add students to existing tuition classes using student index or name.
This is facilitated by the AddToClassCommand and AddToClassCommandParser classes.
The AddToClassCommandParser parses the input from user and decides whether student indices or student names are used.
Students are then added to the respective tuition class with the help of the following operations in AddToClassCommand:
-
AddToClassCommand#categorizeStudents()- Categorizes students into four types, namely students that are added successfully, students with invalid names, students with valid names but not added due to class size limit, and students already enrolled in the class. -
AddToClassCommand#updateModel()- Updates the capacity of the corresponding tuition class and updates the class tag of students enrolled.
Given below is an example usage scenario and how an addtoclass command is executed.
The interactions between the components during the usage scenario is shown in the Sequence Diagram below.
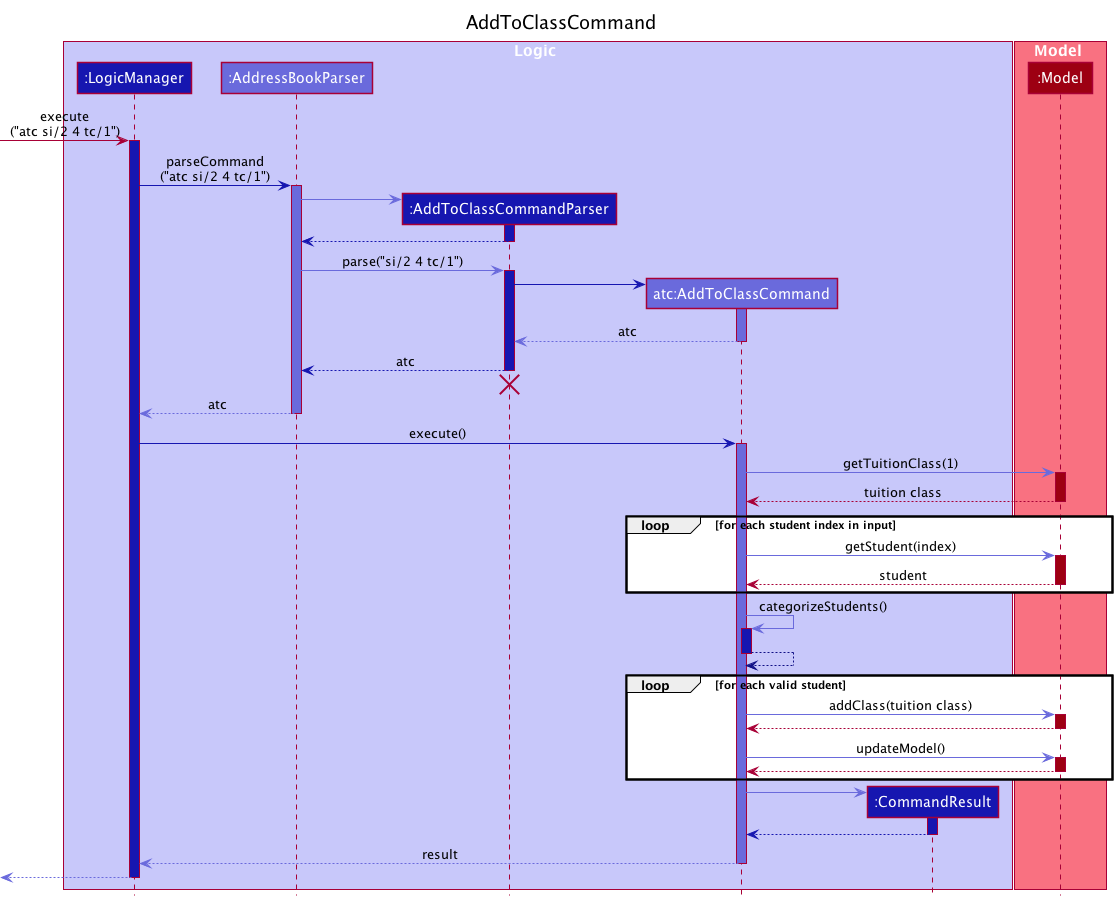
Step 1: The user enters atc si/2 4 tc/1 command to add the second and fourth students to the first tuition class.
Step 2: The AddToClassCommandParser will check and confirm that student indices are used. An AddToClassCommand object with student indices as parameter is constructed.
Step 3: The AddToClassCommand is executed. Student indices, namely 2 and 4, are converted to student names using the UniqueStudentList.
UniqueStudentList would be regarded as invalid indices.
Valid students who are not added due to tuition class size limit or who have been enrolled in the same class previously are identified using the AddToClassCommand#categorizeStudents() method.
Step 4: Newly enrolled students are added to the tuition class. AddToClassCommand#updateModel() is called to change the capacity of the class. It also updates the class tag of the students enrolled to show the ClassName and
Timeslot of the class.
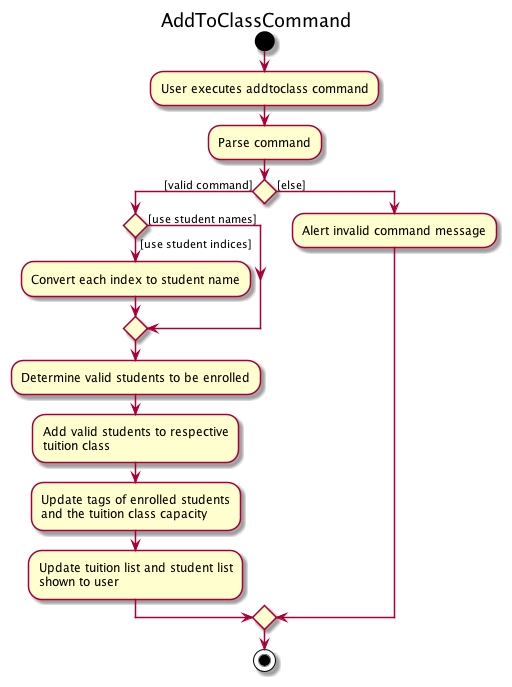
The following Activity Diagram summarizes what happens when a user executes an addtoclass command:
Design considerations
Aspect: Whether to allow users to add students using names:
-
Alternative 1 (current choice): Allows both student indices and student names.
- Pros: More flexible for users to add students to tuition classes.
- Cons: More bug-prone and more difficult for users to learn the commands. This is later resolved by providing more specific instructions in user guide and detailed command feedback in TutAssistor.
-
Alternative 2: Allows only student indices.
- Pros: Easy to implement and avoid confusions to users as command is easy to learn.
- Cons: Users with a lot of students will need to scroll down to find student indices.
[Proposed] Undo/redo feature
The proposed undo/redo mechanism is facilitated by VersionedAddressBook. It extends AddressBook with an undo/redo history, stored internally as an addressBookStateList and currentStatePointer. Additionally, it implements the following operations:
-
VersionedAddressBook#commit()— Saves the current address book state in its history. -
VersionedAddressBook#undo()— Restores the previous address book state from its history. -
VersionedAddressBook#redo()— Restores a previously undone address book state from its history.
These operations are exposed in the Model interface as Model#commitAddressBook(), Model#undoAddressBook() and Model#redoAddressBook() respectively.
Given below is an example usage scenario and how the undo/redo mechanism behaves at each step.
Step 1. The user launches the application for the first time. The VersionedAddressBook will be initialized with the initial address book state, and the currentStatePointer pointing to that single address book state.

Step 2. The user executes delete 5 command to delete the 5th student in the address book. The delete command calls Model#commitAddressBook(), causing the modified state of the address book after the delete 5 command executes to be saved in the addressBookStateList, and the currentStatePointer is shifted to the newly inserted address book state.

Step 3. The user executes add n/David … to add a new student. The add command also calls Model#commitAddressBook(), causing another modified address book state to be saved into the addressBookStateList.

Model#commitAddressBook(), so the address book state will not be saved into the addressBookStateList.
Step 4. The user now decides that adding the student was a mistake, and decides to undo that action by executing the undo command. The undo command will call Model#undoAddressBook(), which will shift the currentStatePointer once to the left, pointing it to the previous address book state, and restores the address book to that state.

currentStatePointer is at index 0, pointing to the initial AddressBook state, then there are no previous AddressBook states to restore. The undo command uses Model#canUndoAddressBook() to check if this is the case. If so, it will return an error to the user rather
than attempting to perform the undo.
The following sequence diagram shows how the undo operation works:

UndoCommand should end at the destroy marker (X) but due to a limitation of PlantUML, the lifeline reaches the end of diagram.
The redo command does the opposite — it calls Model#redoAddressBook(), which shifts the currentStatePointer once to the right, pointing to the previously undone state, and restores the address book to that state.
currentStatePointer is at index addressBookStateList.size() - 1, pointing to the latest address book state, then there are no undone AddressBook states to restore. The redo command uses Model#canRedoAddressBook() to check if this is the case. If so, it will return an error to the user rather than attempting to perform the redo.
Step 5. The user then decides to execute the command list. Commands that do not modify the address book, such as list, will usually not call Model#commitAddressBook(), Model#undoAddressBook() or Model#redoAddressBook(). Thus, the addressBookStateList remains unchanged.

Step 6. The user executes clear, which calls Model#commitAddressBook(). Since the currentStatePointer is not pointing at the end of the addressBookStateList, all address book states after the currentStatePointer will be purged. Reason: It no longer makes sense to redo the add n/David … command. This is the behavior that most modern desktop applications follow.

The following activity diagram summarizes what happens when a user executes a new command:

Design considerations
Aspect: How undo & redo executes:
-
Alternative 1 (current choice): Saves the entire address book.
- Pros: Easy to implement.
- Cons: May have performance issues in terms of memory usage.
-
Alternative 2: Individual command knows how to undo/redo by
itself.
- Pros: Will use less memory (e.g. for
delete, just save the student being deleted). - Cons: We must ensure that the implementation of each individual command are correct.
- Pros: Will use less memory (e.g. for
{more aspects and alternatives to be added}
Documentation, logging, testing, configuration, dev-ops
Appendix: Requirements
Product scope
Target user profile:
- has a need to manage a significant number of students and classes
- prefer desktop apps over other types
- can type fast
- prefers typing to mouse interactions
- is reasonably comfortable using CLI apps
Value proposition: manage students and classes faster than a typical mouse/GUI driven app, and facilitate deconflicting of time slots
User stories
Priorities: High (must have) - * * *, Medium (nice to have) - * *, Low (unlikely to have) - *
| Priority | As a … | I want to … | So that I can… |
|---|---|---|---|
* * * |
Tutor | save the data I put | refer back to the same data at a later time |
* * * |
Tutor | create a new student | keep track of relevant details about that student |
* * * |
Tutor | exit the program | log off from the app |
* * * |
Tutor | set maximum number of students per class | avoid overbooking a class |
* * * |
Tutor | add time slots for classes | schedule extra classes for weaker students |
* * * |
Tutor | delete a student | |
* * * |
Tutor with many students | view the classes scheduled in a timeslot | avoid double-booking a timeslot |
* * * |
Tutor | add new information about an existing student | |
* * * |
Tutor | delete a class | |
* * * |
Tutor | add a student to a class | |
* * |
Tutor | filter students based on class | see which students will be attending a class |
* * |
Tutor | create notes for each class | track the homework assigned to students |
* * |
Tutor | view all classes that are scheduled on a day | prepare the relevant materials early |
* * |
Tutor | create tags for each student | track which students have not paid tuition fees |
* * |
New user | clear all data | start using the program after testing it out |
* * |
New user | see a list of commands | learn what I can do with the software |
* * |
Tutor | search for students by name | follow-up with students who are absent |
* * |
Tutor | bind and edit class fee to a student | remember students’ different fees |
* * |
Tutor | edit a student | keep my information about students up to date |
* * |
Unfamiliar/returning user | check the syntax for specific commands | be reminded of how to use commands |
* |
Forgetful tutor | set a reminder for when I open the app | not forget to prepare for the lessons |
* |
Organised tutor | customise the view of the class schedules | see the relevant classes |
* |
Tutor | export weekly schedule | refer to the notes even on my phone |
Use cases
(For all use cases below, the System is TutAssistor and the Actor is the tutor, unless specified otherwise)
Use case: UC01 - Add Student/Tuition class
MSS
- Tutor chooses to add a new student/tuition class and keys in information about his student/tuition class.
- TutAssistor adds the student/tuition class and displays successful information.
Use case ends.
Extensions
- 1a. TutAssistor detects the wrong format in the user input.
- 1a1. TutAssistor reminds the tutor the right format.
-
1a2. Tutor enters a new command.
Steps 1a1-1a2 are repeated until the Tutor keys in information in the correct format by TutAssistor.
Use case resumes from step 2.
Use case: UC02 - Delete Student/Tuition Class
MSS
- Tutor chooses to delete an existing Student/Tuition Class.
- TutAssistor deletes the Student/Tuition Class and displays successful information.
Use case ends.
Extensions
- 1a. TutAssistor detects the wrong format in the user input.
- 1a1. TutAssistor reminds the tutor the right format.
- 1a2. Tutor enters a new command.
Steps 1a1-1a2 are repeated until the Tutor keys in information in the correct format by TutAssistor.
Use case resumes from step 2.
- 1b. TutAssistor does not detect existing Student/Tuition Class with names indicated by the user.
- 1b1. TutAssistor alerts that the Student/Class does not exist.
-
1b2. Tutor keys in new command.
Steps 1b1-1b2 are repeated until the Tutor keys in the existing student/class.
Use case resumes from step 2.
Use Case: UC03 - Add student to a tuition class
MSS
- Tutor decides to add a particular student to a class.
- Tutor keys in command to add an existing student to class.
- TutAssistor adds student to the class successfully
Use case ends.
Extensions
- 3a. TutAssistor detects an error when the number of students exceeds the limit.
- 3a1. TutAssistor displays error.
Use case ends.
Use Case: UC04 - Edit Student/Tuition class
MSS
- Tutor chooses to edit Student/Tuition class information and keys in the information.
- TutAssistor updates Student/Tuition class information and displays successful information.
Use case ends.
Extensions
- 1a. TutAssistor detects the wrong format in the user input.
- 1a1. TutAssistor reminds the tutor the right format.
-
1a2. Tutor enters a new command.
Steps 1a1-1a2 are repeated until the Tutor keys in information in the correct format by TutAssistor.
Use case resumes from step 2.
Use Case: UC05 - Search Student/Tuition class
MSS
- Tutor chooses to search Student/Tuition class information and keys in the information.
- TutAssistor displays Student/Tuition class information and displays successful information.
Use case ends.
Use Case: UC06 - View tuition classes
MSS
- Tutor keys in command to view the list of tuition classes for the week.
- TutAssistor displays a list of tuition classes for the week.
Use case ends.
Extensions
- 1a. Tutor keys in an unrecognised command.
- 1a1. TutAssistor displays an error message.
- 1a2. Tutor keys in a new command.
Steps 1a1-1a2 are repeated until the Tutor keys in a command recognised by TutAssistor.
Use case resumes from step 2.
Use Case: UC07 - Edit student in a tuition class
MSS
- Tutor decides to edit a student’s details in a tuition class.
- TutAssistor edits the student’s details and displays successful information.
Use case ends.
Use case: UC08 - Remove student from tuition class
MSS
- Tutor chooses to remove a student from a tuition class and keys in the command.
- TutAssistor removes the student from the tuition class and displays the successful information.
Use case ends.
Use case: UC09 - View student
MSS
- Tutor keys in command to view a particular student’s details.
- TutAssistor displays the student’s details successfully.
Use case ends.
Use case: UC10 - Exit
MSS
- Tutor chooses to exit the TutAssistor.
- TutAssistor exits.
Use case ends.
Non-Functional Requirements
- Should work on any mainstream OS as long as it has Java
11or above installed. - Should be able to hold up to 2000 tutees without a noticeable sluggishness in performance for typical usage.
- A user with above average typing speed for regular English text (i.e. not code, not system admin commands) should be able to accomplish most of the tasks faster using commands than using the mouse.
- The response to any command should become visible within 5 seconds.
Glossary
- Mainstream OS: Windows, Linux, Unix, OS-X
- Private contact detail: A contact detail that is not meant to be shared with others
Appendix: Instructions for manual testing
Given below are instructions to test the app manually.
Launch and shutdown
-
Initial launch
-
Download the jar file and copy into an empty folder
-
Double-click the jar file Expected: Shows the GUI with a set of sample contacts. The window size may not be optimum.
-
-
Saving window preferences
-
Resize the window to an optimum size. Move the window to a different location. Close the window.
-
Re-launch the app by double-clicking the jar file.
Expected: The most recent window size and location is retained.
-
-
Exiting the program
- Close the window or click on File > Exit in the top left corner.
Expected: The user logs off the programme.
- Close the window or click on File > Exit in the top left corner.
Deleting a student
-
Deleting a student while all students are being shown
-
Prerequisites: List all students using the
listcommand. Multiple students in the list. -
Test case:
delete 1
Expected: First student is deleted from the list. Details of the deleted student shown in the status message. Timestamp in the status bar is updated. -
Test case:
delete 0
Expected: No student is deleted. Error details shown in the status message. Status bar remains the same. -
Other incorrect delete commands to try:
delete,delete x,...(where x is larger than the list size)
Expected: Similar to previous.
-
Editing remarks
-
Editing the remarks of a student
-
Prerequisites: List all students using the
listcommand. At least one student in the list. -
Test case:
remark 1, inputHello World!, then click Ok.
Expected: The remarks of first student is changed toHello World!. Details of the edited student shown in the status message. Timestamp in the status bar is updated. -
Test case:
remark 1, inputHello World!, then click Cancel or close the window.
Expected: The remarks of first student remains as the previous input`. Details of the edited student shown in the status message. Timestamp in the status bar is updated. -
Test case:
remark 0
Expected: Remark Editor window does not open. Error details shown in the status message. Status bar remains the same. -
Other incorrect delete commands to try:
remark,remark x,...(where x is larger than the list size)
Expected: Similar to previous.
-
-
Removing remarks of a student
-
Prerequisites: List all students using the
listcommand. At least one student in the list. -
Test case:
remark 1, remove all input in the text area of the Remark Editor, then click Ok.
Expected: The remarks of first student is removed. Details of the edited student shown in the status message. Timestamp in the status bar is updated.
-
Viewing help
-
Viewing help for TutAssistor
-
Enter help and press enter.
Expected: A help message is displayed in a separate help window. It also contains a Open User Guide button which opens up the TutAssistor user guide. -
After opening the help window, click on the Open User Guide button.
Expected: The TutAssistor user guide opens in your browser.
-
Saving data
The data file that stores student and tuition class objects can be found in data/addressbook.json.
-
Dealing with corrupted data files
-
Prerequisites: the data file contains at least one student object, and directly modify a student’s email to
12345678. -
Launch TutAssistor.
Expected: The terminal shows the following error:INFO: Illegal values found in data\addressbook.json: Emails should be of the format local-part@domain and adhere to the following constraints: 1. The local-part should only contain alphanumeric characters and these special characters, excluding the parentheses, (+_.-). The local-part may not start or end with any special characters. 1. This is followed by a '@' and then a domain name. The domain name is made up of domain labels separated by periods. The domain name must: - end with a domain label at least 2 characters long - have each domain label start and end with alphanumeric characters - have each domain label consist of alphanumeric characters, separated only by hyphens, if any.Both student and tuition list panels should be empty. The corrupted data file will be replaced when new student or tuition class objects are added to TutAssistor.
-
Delete the corrupted file, then launch TutAssistor.
Expected: All previous data are replaced with the sample data.
-
-
Dealing with missing data files
- Delete the data file and launch TutAssistor.
Expected: TutAssistor is populated with sample data.
- Delete the data file and launch TutAssistor.
-
Transferring data files across different platforms.
- Copy the entire content from one data file to another.
Expected: the TutAssistor on both platforms will contain the same set of data.
- Copy the entire content from one data file to another.